Here’s a meal prep friendly stir fry that doesn’t need high heat! Let me show you how to make this calorie-conscious meal along with an all-purpose dipping sauce, plus a bonus section on how to grow your own scallions.

Time: 3/5
Another one of those “dinner for a week in an hour” scenarios
Effort: 3/5
A multi-stage process that keeps you close to the stove, but not too technically demanding
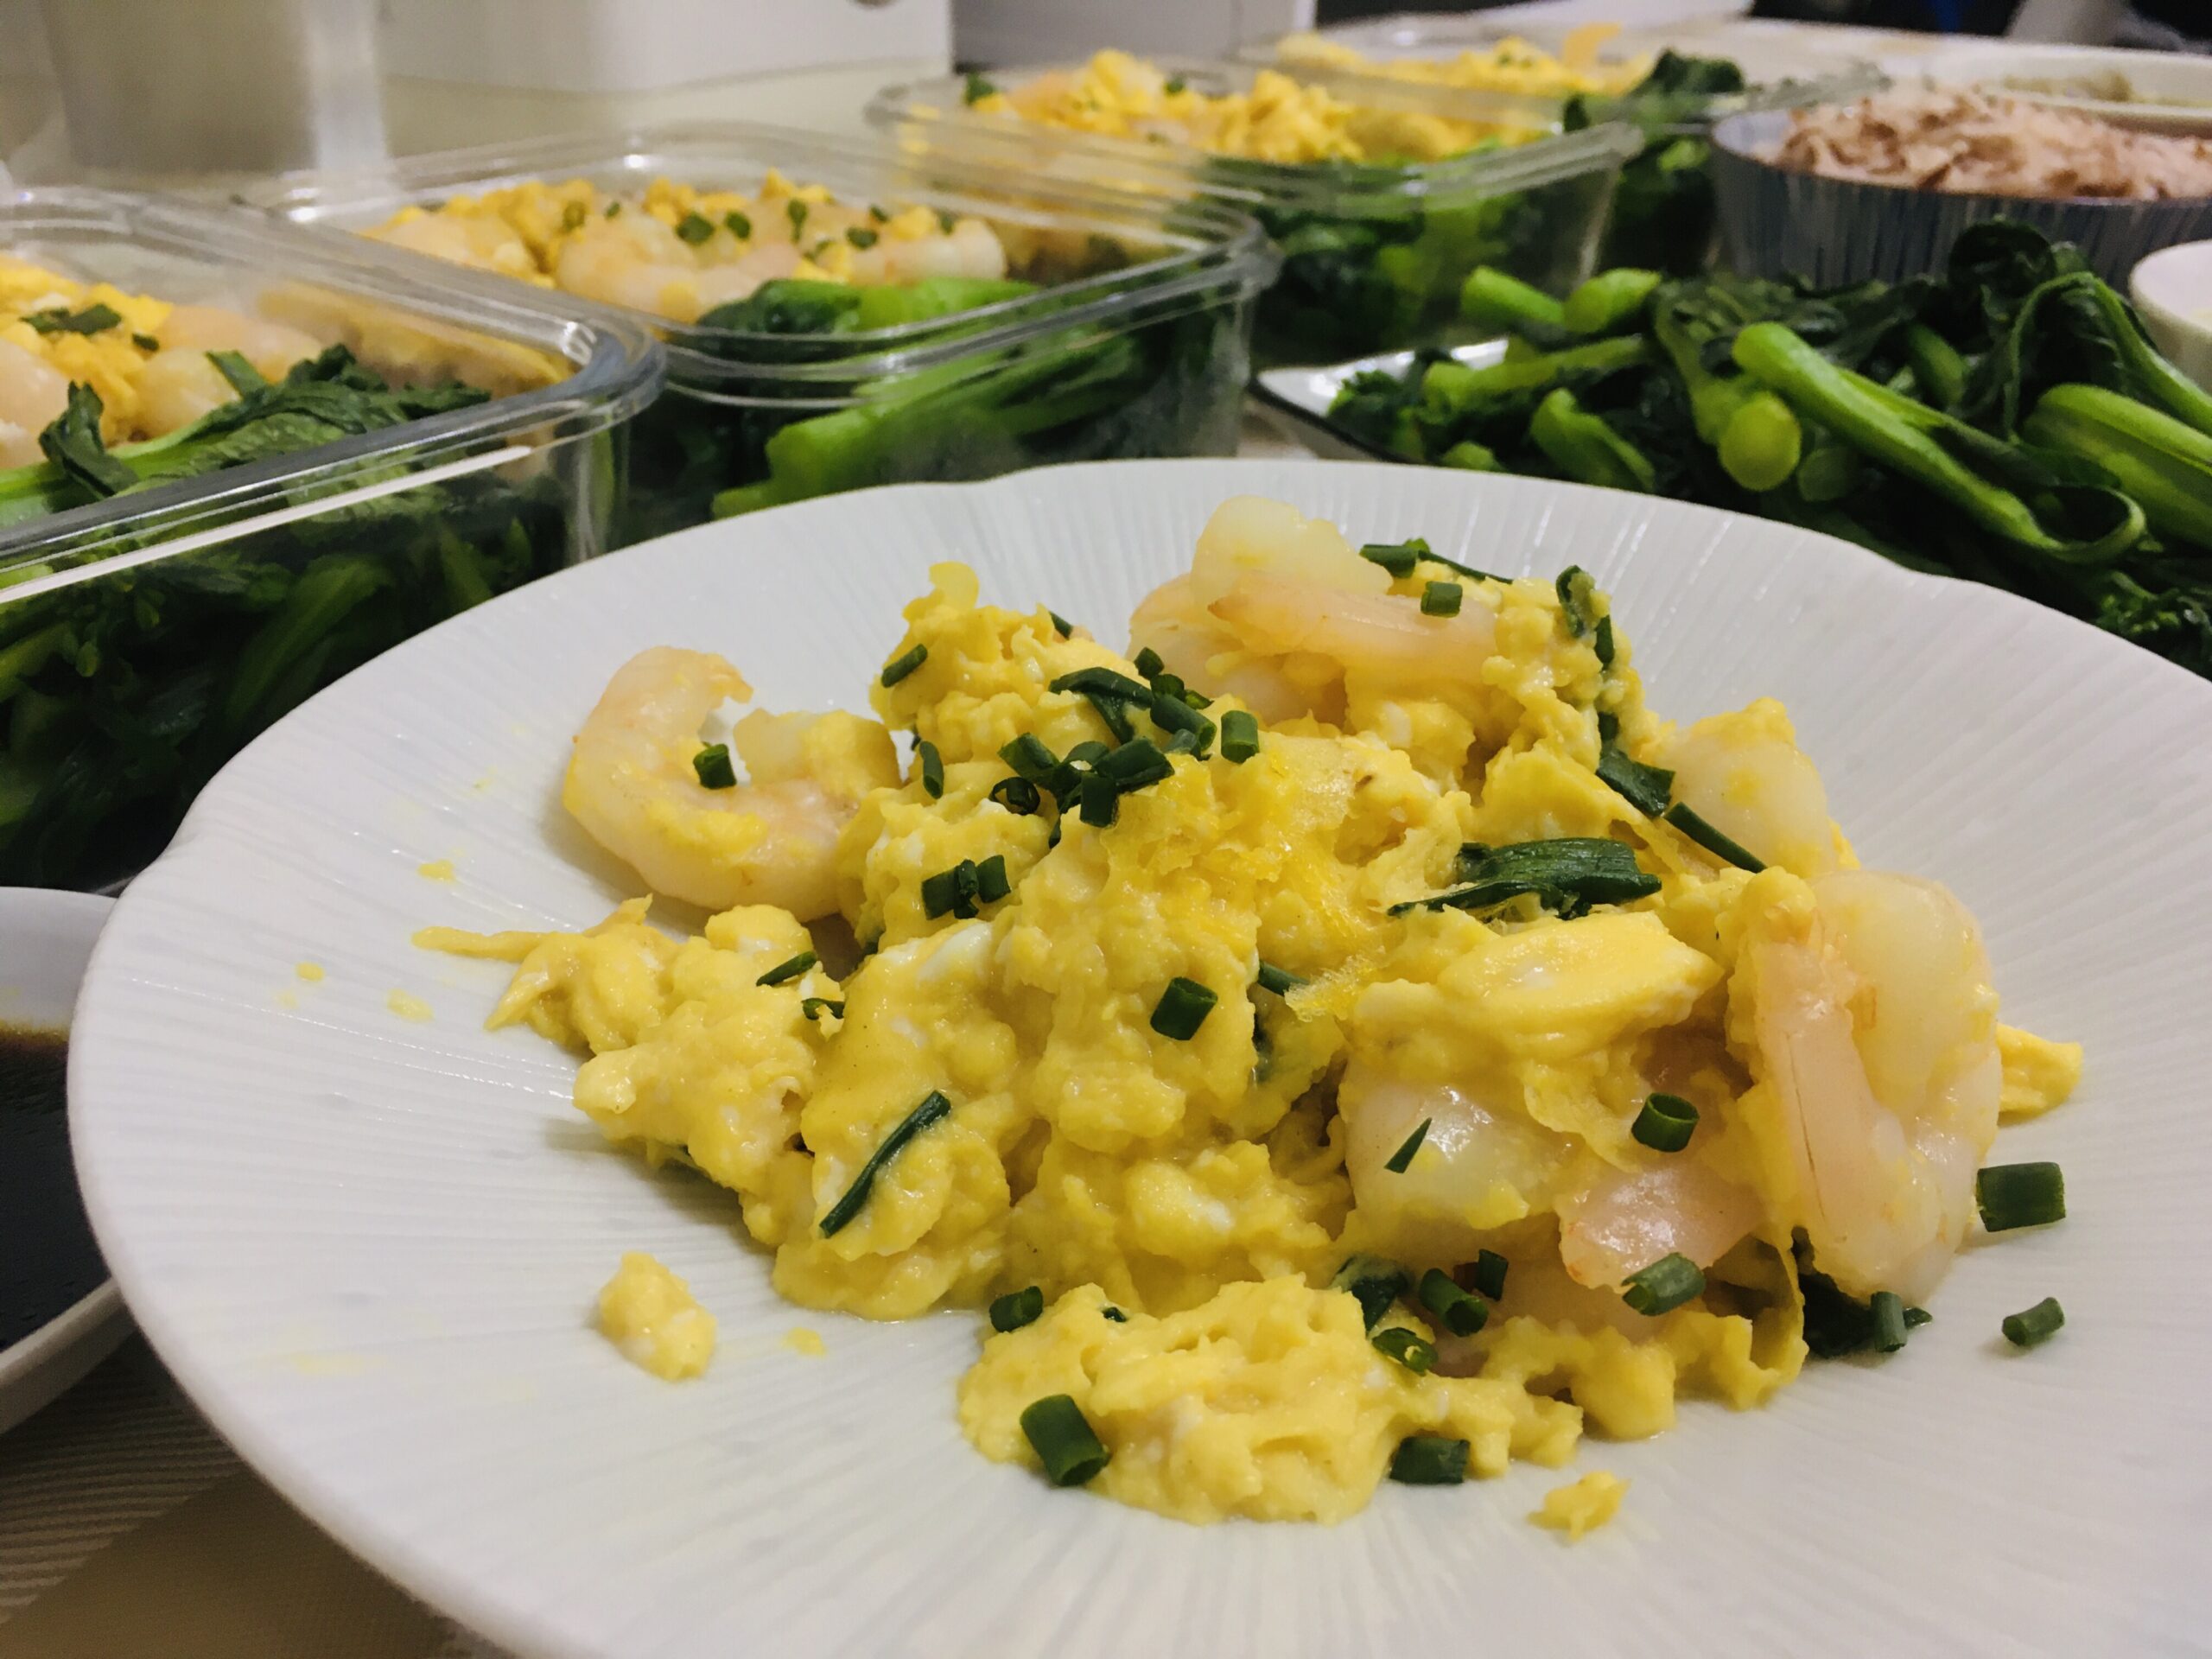
Shrimp and eggs and eggs and shrimp
In the kitchen, as in life, every now and then you come across an oddball exception that bucks the trend. Stir fries are all about the char and the wok hei, but then there are dishes like this shrimp and egg stir fry.
This is a dish where you actually don’t want any browning at all, not on the eggs, not on the shrimp. You want to keep everything very gentle and sweet and tender, and the Maillard reaction just doesn’t get you there.
Which means that, unlike other stir fries that need a jet-engine stove to thrive, this shrimp and egg stir fry can be easily made with common hardware in the domestic kitchen. In this regard it’s similar to its cousin, the tomato and egg stir fry. Shrimp and egg are both very lean sources of protein, which makes this a good recipe if you’re watching your calories.
And because this recipe doesn’t need very concentrated heat, it’s much more meal-prep friendly than other stir fries that require you to work in small batches. You might rightfully worry that the shrimp and the egg will turn rubbery after being microwaved, but I was pleasantly surprised to find that it wasn’t as big of a problem as I expected.

Special Soy Sauce
I’m quite proud of myself for this – many restaurants have their own proprietary recipes for enhancing plain old soy sauce, and the sauce can become one of the ways of differentiating a good Canto diner from a great one. By making my own version of special sauce I feel like a bona fide big boy cook.

Special soy sauces can be as simple as just adding sugar, or they can be complicated and highly involved affairs that include esoteric ingredients and tedious processes.
I chose to go somewhere in the middle and gave more depth to my light soy sauce with some dark soy and oyster sauce. I also made an aromatic oil by frying shallots and scallion greens to enhance the smell (which, as many of you know, is a big part of flavour). A bit of sugar and Shaoxing wine to round things out is of course always a good idea.
What surprised me, however, was how important adding water was. Because soy sauce is so salty in its undiluted form, it’s easy to overshoot when trying to add it to food in its original state. Once you add water and expand the volume, it becomes a much more satisfying experience to drizzle a lot of sauce over something without salting it to death.
Besides a finishing sauce, a special soy sauce can also be a dipping sauce (hot pot, anyone?) or even a stir fry sauce. In fact, the ingredients are very similar to the all-purpose sauce that I use to stir fry pork and peppers, as well as beef and leeks. Feel free to use my version as a starting point and make it your own – after all, you are the Hugo Boss of your Special Soy Sauce!
How to Grow Your Own Scallions
Where I used to live, the grocers would give away scallions for free whenever you buy vegetables. But the shops where I live now all insist on charging by the bunch if you want scallions, and that annoys me quite a bit.
It’s not that I’m not willing to pay money for scallions. It’s just that it’s hard to use up a whole bunch of scallions if you’re only planning on using a bit of the greens for garnish, or if you only want the scallion whites to make scallion oil. Whatever you don’t use at first becomes wilted and sad in your fridge over the course of the week, despite carefully wrapping them in a slightly damp paper towel to try extend their shelf life.

Fortunately, there’s a better way. Instead of trying to keep the scallions fresh in the fridge, why not keep them fresh in a pot of soil? Turns out it’s quite a simple matter to grow the scallions you buy at the store. Simply cut the whites about an inch above the roots, plant the roots in soil and leave them in the sun. Keep the soil damp by watering every day or so, and green shoots will grow back.


It takes some maintenance, however. Scallions like to do nothing for a week or two, then suddenly bolt up and flower – look for a narrowing of the shoots near the tip, followed by a whitish-yellow bit at the very end. Whenever you see the flowers start to appear, pinch them off! If you don’t, the plant will wilt and die very soon, I suspect it’s because natural selection made them so that there isn’t much evolutionary reason to stay alive after they’ve given off their pollen, or something like that. Any botanists or gardeners in the audience, please tell me what’s going on.

Despite my best efforts with all the watering, fertilising and deflowering ( ͡° ͜ʖ ͡°) ( ͡° ͜ʖ ͡°) ( ͡° ͜ʖ ͡°), I haven’t been able to get more than three or four harvests from each planting. The shoots get thinner and thinner with each regrowth, until the plant just stops trying. But that still beats having to buy more scallions than you can use at the store every time you just need a little bit. Besides, freshly picked scallions are noticeably more fragrant than scallions from the store. So I count that as a win-win for me.

Dramatis Personae
Served 6.
Special soy sauce
The sauce doesn’t need to stay warm, which is why I’m making it first. You can make a lot in one go, then store the rest for later. The liquid portion of the sauce is roughly 3 parts light soy, 1 part dark soy, 1 part oyster sauce, and two parts each of Shaoxing wine and water. Add to that about 1 part sugar as well.

Then there’s the aromatic oil part, for which you’ll need a tablespoon or two of vegetable oil, scallion whites and shallots. Garlic and ginger are also welcome additions, but I wanted to keep things simple on my first try.
Don’t worry about how much of each aromatic to add, it will all work out in the end. Make sure to keep them in large pieces however, so they’re easier to fish out at the end.
Choi Sum – 1.5kg
Always eat your veggies! My mother always said that choy sum harvested in the winter is sweeter, and mother is always right. The smaller, younger shoots also tend to be less fibrous and have less of a grassy taste, and so they tend to cost a bit more. You’ll have to make the call on whether or not that’s worth it for you.

Since the pan will already be dirty from making the special soy sauce, I might as well recycle the seasoning from the sauce by stir frying the choi sum next. It needed a teaspoon or so of extra salt as well, and some garlic is always nice.
As an added bonus, the vegetables will mop up the residual sauce and leave us with a clean pan to cook the shrimp and eggs with. A big brain move to save on dishes.
Shrimp – 1kg
Buy them shell-on if you want, but you’ll rarely catch me doing that. I want the shrimp for their protein, and unshelled shrimp is only something like 50% flesh. Sure, it’s nice to have the shells for stock or for making some aromatic oil, but it’s too much of a pain in the ass to go through the process of peeling and deveining. Plus, you got to pay to buy the weight of the shell too – why buy yourself more trouble?

Sometimes you want the umami shrimpy flavour to come through, like in a Stir Fry Supreme. Save your unpeeled shrimp for those situations, in my humble opinion. Or maybe if you already know what you’re going to do with the shells. Otherwise, I’d go with shelled shrimp every time.
Eggs – 10, large
If you’re worried about the cost of shrimp, you can always adjust the egg to shrimp ratio. The proportion I use here is pretty generous shrimp-wise, and you can easily double the amount of eggs (or halve the shrimp) and still get a comparable culinary experience.

One of the ways I save on effort in this dish is by seasoning the eggs only. Two teaspoons each of salt and white pepper, some of the scallion greens, plus a small pinch of MSG or chicken bouillon powder is all you need since the egg is going to coat all the shrimp and bring seasoning to every bite.
Executive summary
- Make rice. Wash vegetables. Prepare aromatics and gather ingredients.
- Fry aromatics in oil on low heat until fragrant. Add the other special soy sauce ingredients, and simmer briefly until the sugar is dissolved. Fish out aromatics, and reserve the sauce.
- In the same pan, stir fry vegetables and season to taste. Reserve.
- While working on the sauce and the vegetables, find time to beat and season the eggs.
- Once vegetables are done, turn the heat up to medium and add shrimp to the pan. Stir occasionally.
- When shrimp are almost done, add eggs and stir until barely set.
- Assemble and serve.
Play by Play

Here’s some red rice that have been soaking since the morning. I add the white rice, then I do two cycles of swish and rinse. There’s no need for the water to run clear, it’s fine if it’s still a bit cloudy like you see here. That way the rice clumps together a bit, and you can pick up bites of rice with chopsticks.


Last things first, because we’ll be kept busy. Beating the eggs together with the white pepper and chicken powder.


Always wash your veggies! Get rid of all that dirt, and make sure there aren’t any worms or snails hitching a ride.

From each according to ability … might as well get some garnish from the scallion greens while we’re here. This is also when I get the scallions and other stuff for the special soy sauce together.

Ok, I think that’s about everything, let’s go!


Develop some char on the aromatics before adding the liquid ingredients for the special soy sauce. It’s done once the sugar is dissolved – we went through all this effort to dilute the soy sauce, there’s no need to reduce it further. Get rid of the solids and reserve the sauce.


Ah, the dance with death I perform every time I meal prep. Will the vegetables fit? As always, the answer is that victory will go to (s)he who perseveres. Stir carefully.


Yes, the pan is overcrowded. No, it doesn’t matter. No, it’s not just because I’m lazy. Remember we’re trying to keep the flavours delicate here, and browning the shrimp goes against that. Save your hard sears for making Stir Fry Supremes, shrimp pasta with olive oil and things of the sort.


Heat down, eggs and scallion greens in. Save some greens for the top, though. Fold the eggs gently until cooked to your liking.

Dinner is served! Serve the special soy sauce on the side, or drizzle all over.
Keep browsing by categories, or by tags:
Beef Blanching Broccoli Cabbage Carrots Cast iron Chicken Cucumber Curry Daikon Dashi Date Night Dried shrimp Eggplant Eggs Fish and seafood Garlic Ginger Glass noodles Gochujang Honey Miso Napa cabbage Onion Oven Pasta Pork Potatoes Rock sugar Salmon Sesame oil Shiitake mushrooms Shrimp Sous Vide Spicy Steaming Stewing Stir fry String beans Sweet potatoes Teriyaki Thai basil Tomatoes Yogurt Zucchini