Zongzi, or Sticky Rice Dumplings, are savoury dumplings that are traditionally made for the Dragon Boat Festival. Learn everything about them in this guide.

Time: 5/5
Prep begins a day or two ahead of time, and wrapping takes all morning
Effort: 5/5
Better have help around, which is just as well because wrapping is more fun together.
Summary
This post ballooned into something much more massive than I originally envisaged, so much so that my usual post structure doesn’t work well. So here’s a new format, plus the first Table of Contents in Served With Rice History.
In this comprehensive guide to Joong / zongzi / sticky rice dumplings, I will tell you:
- The story behind the Dragon Boat Festival, and the story of zongzi in my family
- How to prepare each component of zongzi (start here to skip to recipe!)
- The different ways to wrap zongzi
- How to cook zongzi
- Points to note when storing zongzi on the counter, in the fridge and in the freezer
- Tips for reheating zongzi with the stove and the microwave
- What to do with the leftovers from making zongzi

Food is love, and sharing is caring
Happy Dragon Boat Festival! Legend has it that during the Warring States period in China, a politician (known to me as Wat Yuen, but probably better known as Qu Yuan) tried to warn his king against some unwise policies. The king did not listen, and being the loyal and patriotic exemplar of the ideal gentleman-scholar he is, he drowned himself in a river in protest. The common people didn’t want the fish in the river to consume his body, so they made sticky rice dumplings ( joong, or zongzi) and threw them into the river hoping the fish will eat those instead.
One thing led to another, and centuries later people race rowing boats with dragons’ heads on their prows once every year. The dumplings are no longer meant for the fish, and are consumed by people instead. Dumplings for appetisers and poet for dessert – I think the fish got the better end of the deal here.
But, I digress. 粽 (joong / zongzi) are savoury dumplings made from glutinous rice (also known as sticky rice) and various other fillings, which are wrapped in bamboo leaves and boiled. They’re similar in concept to Tamales, and they also play a similar role in life in terms of how they bring people together by virtue of how labour-intensive they are, and in this way facilitate social connections and the expression of love for one another through making and sharing food.

I cannot discuss zongzi without talking about my grandmother. She was the eldest daughter of a peasant family, and helped bring up eight younger siblings all while being too busy on the farm to get much education. She survived the famines of the Great Leap Forward on smuggled vegetables, endured a turbulent marriage with an alcoholic and chronically indebted husband (who, to his credit, turned his life around in his later years), and brought up her children essentially by herself as a first generation immigrant while making ends meet by picking up cleaning and manufacturing jobs.
While she wasn’t busy kicking ass, my grandma cooked. She cooked for her children, she cooked with her neighbors, she cooked with her colleagues to make the crew meal at the factory. And everyone loved her cooking. Over time she absorbed techniques, recipes and culinary traditions from the diaspora hailing from all around China. My mother helped out in the kitchen since she was a little girl, and became an avid home cook herself. You could say that home cooking runs in the family.
Grandma’s sticky rice dumplings came from this milieu of cross-pollination. She got her start joining the other young mothers making zongzi for the Dragon Boat Festival, and absorbed the experience and techniques of the other housewives. Years turned into decades, and the eclectic mix of cultural traditions got distilled into a recipe that her factory’s owner declared superior to all the fancy-pants joong sold by five-star hotels and famous restaurants.
Grandma’s well past 80 by now, and still going strong. Her joong have become legendary among the people who know her. Every year when the Dragon Boat Festival comes around, she gets orders for her sticky rice dumplings from her friends and neighbors. Her granddaughter asks for dozens as gifts for her business partners. And of course, everyone in the family are guaranteed their share of sticky rice dumplings.
She keeps track of all these orders in her head, and makes quite literally hundreds of them over the course of a week. Four for my aunt’s family, four for my uncle’s, four more for my cousin’s fiancé. Six for the Chans next door, and another half dozen for her mahjong clique. One for the widowed Mrs. Wong upstairs because all her sons are in the US, and she can count the number of times a year that she gets to speak to someone on the fingers of her diabetic hand if she wasn’t already half-blind from cataracts. joong is love, and sharing is caring.

There’s something about growing up that makes you treasure your past, and want to know more about where you came from. Sometime during my 20s, it was like a switch flipped in my head and I began to collect the oral histories of the older generations. And my grandma’s zongzi was a great place to begin.
Over the last few years, I’ve placed myself under her apprenticeship and picked her brain for everything she knew about making joong. You can imagine how difficult it is to get exact measurements from an Asian grandma (how much oil should I put in the rice? “Some.”), but I’ve tried my best to present here her version of zongzi, the version she refined over many decades. The sticky rice dumplings I grew up eating, the ones beloved by so many.
I proudly present here a comprehensive guide to my grandmother’s joong / zongzi, from a discussion on the preparation and fine points of each ingredient, to the different techniques and shapes, to the process of cooking all the way to storage and reheating. Here it is, documented in detail, for the benefit of posterity, for all to enjoy.

Ingredients
Bamboo leaves

Allow for 3 to 5 leaves per dumpling. How many leaves you need depends on which shape you want to make them (I will tell you two variations later on). You also want some extra leaves in case some of them are too small, too dry or have cracks in them.
Where I live these are sold at the market dried and by weight. These need to be cleaned by wiping both sides with a damp towel, then boiled in water very briefly to rehydrate them and make sure they’re soft and supple enough to endure the rigours of wrapping. After cleaning and boiling, cut the tips and the stems off.
Shichito Matgrass

I know these as 鹹水草 (haam shui cho / xian shui cao) The scientific name for this is the Cyperus tegetiformis. They’re kind of like rushes or reeds, and are related to papyrus. They grow in the water, and after they’re harvested they’re dried under the sun to be used as a sort of environmentally-friendly packaging material. Fishmongers use it to truss live crabs to stop them from using their pincers, and some vegetable stores use them to tie bunches of produce together.
Like bamboo leaves, they’re also sold by weight. They need a brief soak in water to soften them up, but only for a couple of minutes. Any longer, and they may become too soft and break if you put too much tension on them.
Kitchen twine is a useful substitute for shichito matgrass. It’s easier to work with and can handle much more tension without breaking, which makes it more beginner friendly. Keep some twine around in case you run out of matgrass, or just use twine entirely.
Glutinous rice

Also known as sticky rice. Unlike jasmine or basmati rice, glutinous rice turns into an amorphous wet clump if you try to boil them in water. That is why when you see recipes that use this as an ingredient, for example in Thai-style mango sticky rice, you’re told to steam the glutinous rice instead of boiling it.
When we make zongzi however, we limit the expansion of the rice grains by constraining them in the bamboo leaves. If they’re tightly wrapped, they become a firm homogenous dumpling rather than a goopy mess.
Grandma says that 3 catty (1.8kg, or about 4lbs) of glutinous rice makes a bit less than 40 small joong. Of course, this depends entirely on how big you make your sticky rice dumplings. The process of dumpling making is very far from a precise science.
The raw rice needs to be washed, drained well and seasoned with a bit of salt and oil. You see grandma doing that in the picture, before we all go in with the spoons to mix the seasonings into the rice. The oil is partly for taste and texture, and partly to stop the rice from sticking to the insides of the leaves.
Dried Mung Beans

Mung beans are rich in protein and fiber, which makes them quite satiating. Glutinous rice is pretty dense too, which means the two primary components of zongzi are both very substantial and filling. If you finish one dumpling and are having thoughts about having another, allow me to advise you to wait half an hour before you act on your impulse. Zongzi have a tendency to grow heavier and heavier in your stomach!
Grandma does about half the weight of the glutinous rice in mung bean and that’s a fine ratio for most people, but whenever my mom is involved we always run out of mung bean before we run out of rice because she loves beans in her dumplings and goes 1:1. The exact ratio depends on your preference.
Take dried mung means from the store and give them a rinse. Soak them in room temperature water for 3-4 hours to soften them up, then drain well. Traditionally these would be salted and oiled too, but grandma stopped doing that because there’s already plenty of flavour going on in the rest of the Jung.
Other fillings
The fillings depend entirely on your preference. I’m going to show you the way my family does it, but keep in mind that you’re the Yao Ming of what goes into your dumpling.
There’s also a sweet version of Jung (鹼水糭; gaan sui Jung / jian shui zong, literally alkaline water dumplings), which are also made with glutinous rice and mung bean, plus maybe sweet fillings like red bean paste. They’re boiled in an alkaline solution of sodium carbonate in water (hence the name), after which you cut into small pieces and dip in sugar before each bite. That’s outside the scope of this guide though, as in my opinion the savoury version is so much more delicious!
Pork

For Jung, my grandma always asks the butcher for a cut called 不見天 (bud geen teen / bu jian tian) which literally means “never sees the sky”. Can you guess which part of the pig this cut is from?
It’s the armpit! I was surprised when I first heard it too. It’s my grandma’s choice because of its balance of lean, meaty flesh and fat. It also breaks down and becomes all tender and soft after cooking low and slow. In that sense, it behaves like pork shoulder or pork butt (which makes sense, as the armpit is close to the shoulder).
Cut into small chunks. Marinade in salt, white pepper and five spice powder the day before.
Salted egg yolks

Important for adding richness and savouriness. The golden pieces of yolk crumble into delicious little bits of fatty umami saltiness that gets mixed into the rest of your bite as you chew.
Salted eggs are usually made by curing raw duck eggs in salt. The yolks turn solid from this process, but the whites remain liquid. We only want the yolks for the Jung, so strain the whites and keep them in the fridge. Use them (sparingly) for applications like seasoning steamed meatloaf, or making egg drop soup on savoury steroids.
Shiitake mushrooms

Dried shiitake mushrooms keep well at room temperature, and are great for adding umami flavours and meaty textures to whatever you’re cooking. If you’re buying them specifically for Jung, choose smaller mushroom because they’re easier to wrap.
The stems are quite tough so snap them off (unless they’re too small for you to do so) and save them for soup or stock. Give them a rinse, then rehydrate in fresh water overnight.
Next, you want to cook them a bit to make sure they’re nice and tender, and we can add even more flavour to them while we do so. Stir fry ginger in a pan until fragrant and add the rehydrated mushrooms together with the soaking liquid, some oyster sauce and a touch of sugar. Simmer for a couple minutes, or until the sauce has thickened into a glaze.
(Check out all these other ways to use shiitake mushrooms.)
Dried seafood


Gives bold, meaty and umami flavour to the rice and the beans. My grandma always uses dried shrimp and dried scallops when making Jung. You can use one or the other, or indeed neither, but why miss out on all that flavour?
As a general rule, you want to rinse dried seafood and rehydrate in fresh water overnight, then draining before using them. Keep the rehydrating liquid as a savoury boost to soups, broths, vegetable dishes and stir fry sauces.
As usual, the bigger the pieces the more expensive they are. It’s more dramatic to bite into a dumpling to find a coin-sized piece of dried scallop, or a whole inch-long piece of dried shrimp. But to be honest they all taste the same, so unless you’re gifting your Jung and aiming to impress, just use the smaller and cheaper stuff.
(I use dried shrimp and dried scallops in other recipes on the blog too!)
Siu Mei (Chinese Barbecue)


Like many of the other ingredients, they impart meaty, smoky, umami flavours to the rest of the dumpling, Roast duck is a family favourite, as is roast pork. Some years we do one, some years the other, but this year grandma decided to go all in and do both.
We just get ours from a shop. You could make your own Siu Mei at your own peril. I don’t know anyone who is dedicated (or desperate) enough to do that. In all honesty, there’s already so much flavour going on that you wouldn’t miss too much if you left them out.
You have to make a choice about whether or not to de-bone before you wrap. Bone adds flavour, but it also adds to inconvenience when eating the dumpling. I prefer to de-bone just to not have to deal with it later, and if you’re cooking for very young children or people who might choke easily I would recommend you debone too.
Leaving the skin on, however, is absolutely non-negotiable. Leave. The. Skin. On. They make so much difference in contributing rich, roasty, meaty flavours to the dumpling. In fact, make it a point to ensure that there’s a piece of skin in each dumpling. You don’t want whoever ends up with the skinless dumpling to feel left out.
Whether you leave the bones on or remove them, cut the Siu Mei into small pieces so they’re easier to wrap.
Wrapping Zongzi
It’s best to schedule a joong wrapping party in the morning, because it takes so long for each batch of joong to cook. Then you need to taste the first batch, and wait for the joong to cool down before each person takes their share back home. It’s usually mid-afternoon by the time everything is said and done.
Plus, you might have multiple batches going on – in that case, it is common courtesy for the more time-constrained guests to take their pick from the earlier batches and the host to keep the later ones. In any case, you’ll be done wrapping before you’re done cooking, so take the time to sit around, have some tea, and enjoy each other’s company.
Technique
While the exact steps for making sticky rice dumplings / zongzi in different shapes may vary, the general flow goes as follows:
- Make a cone with the leaves
- Fill with glutinous rice, then the mung beans, then fillings of choice
- Add reinforcing leaves
- Cover fillings with mung beans, then rice
- Fold the leaves over the fillings
- Wrap up and tie up the completed Joong.
Geometric variations
There are all sorts of shapes you can wrap zongzi into, but the two common shapes my family makes are the three-leaf tetrahedron and the four-leaf pyramid. Other variations include one-leaf tetrahedrons, and cubes.
I’ll show you both, so you can follow along and decide which one you like better. It’s also useful to know different shapes if you make Jung with different fillings, so you can wrap one type of Jung in one shape and wrap the other in a different one to tell the two apart.
The Tetrahedron
I started off learning this, and in my opinion it’s the easier, more foolproof shape. Choose longer, narrower leaves for this, because you need a long ‘tail’ to fold over the fillings at the end to form a lid.


Each bamboo leaf has a shiny side and a more matte side. You want the shiny side to be the one touching the food, and the matte side facing outwards. Take two leaves and align them in parallel, overlapping by about half of their width. Make a fold about 1/3 of the way from the top.


After you fold the top third down, fold again along the midline. You’ll get four layers of leaves stacked together. Take three of those layers and push to one side to form a cone with a corner. Kind of like making a funnel out of a circular piece of filter paper, if you ever did chemistry in school.


Congratulations, you now have a cone! You can see my inexperience by noting how the layers in my cone are separating – this is not a very good cone, and there’s a risk that rice can slip out through the gaps. In any case, keep a hold on that corner to stop the cone from falling apart.


Now it’s time to fill! The rice forms the exterior, so that goes in first. You’re seeing about a tablespoon of rice, which is a reasonable amount for a modestly sized dumpling. The mung beans are next, followed by any fillings you want.


If you want to make a bigger dumpling, add your reinforcing leaf before covering the fillings with more mung beans and rice. I am trying to make a small one, so I went ahead and finished up with another tablespoon each of mung beans and rice.


Now it’s time to add the reinforcing leaf. The reinforcing leaf doesn’t have to be particularly good quality, so feel free to use your misshapen or cracked leaves for this. I’m slipping the leaf between my thumb and the outer leaf of the cone, wrapping it around the corner and tucking it between my fingers and the outside of the other side of the cone.


Now that the reinforcing leaf has built up the sides high enough, we can begin to close up the joong! Take one side and fold it over, then fold the other side over as well. There should be a long ‘tail’ of bamboo leaf pointing towards yourself. Take that tail and fold it over. Hold it in place with your thumb while you take a length of twine or shichito matgrass from the pile.


Truss ‘er up! A circle or two around one end, then a circle or two around the other. Repeat until you’ve used up most of the length of rope, then close things off with a knot of your choice. You can go all fancy, but I just went with a double surgeon’s knot.

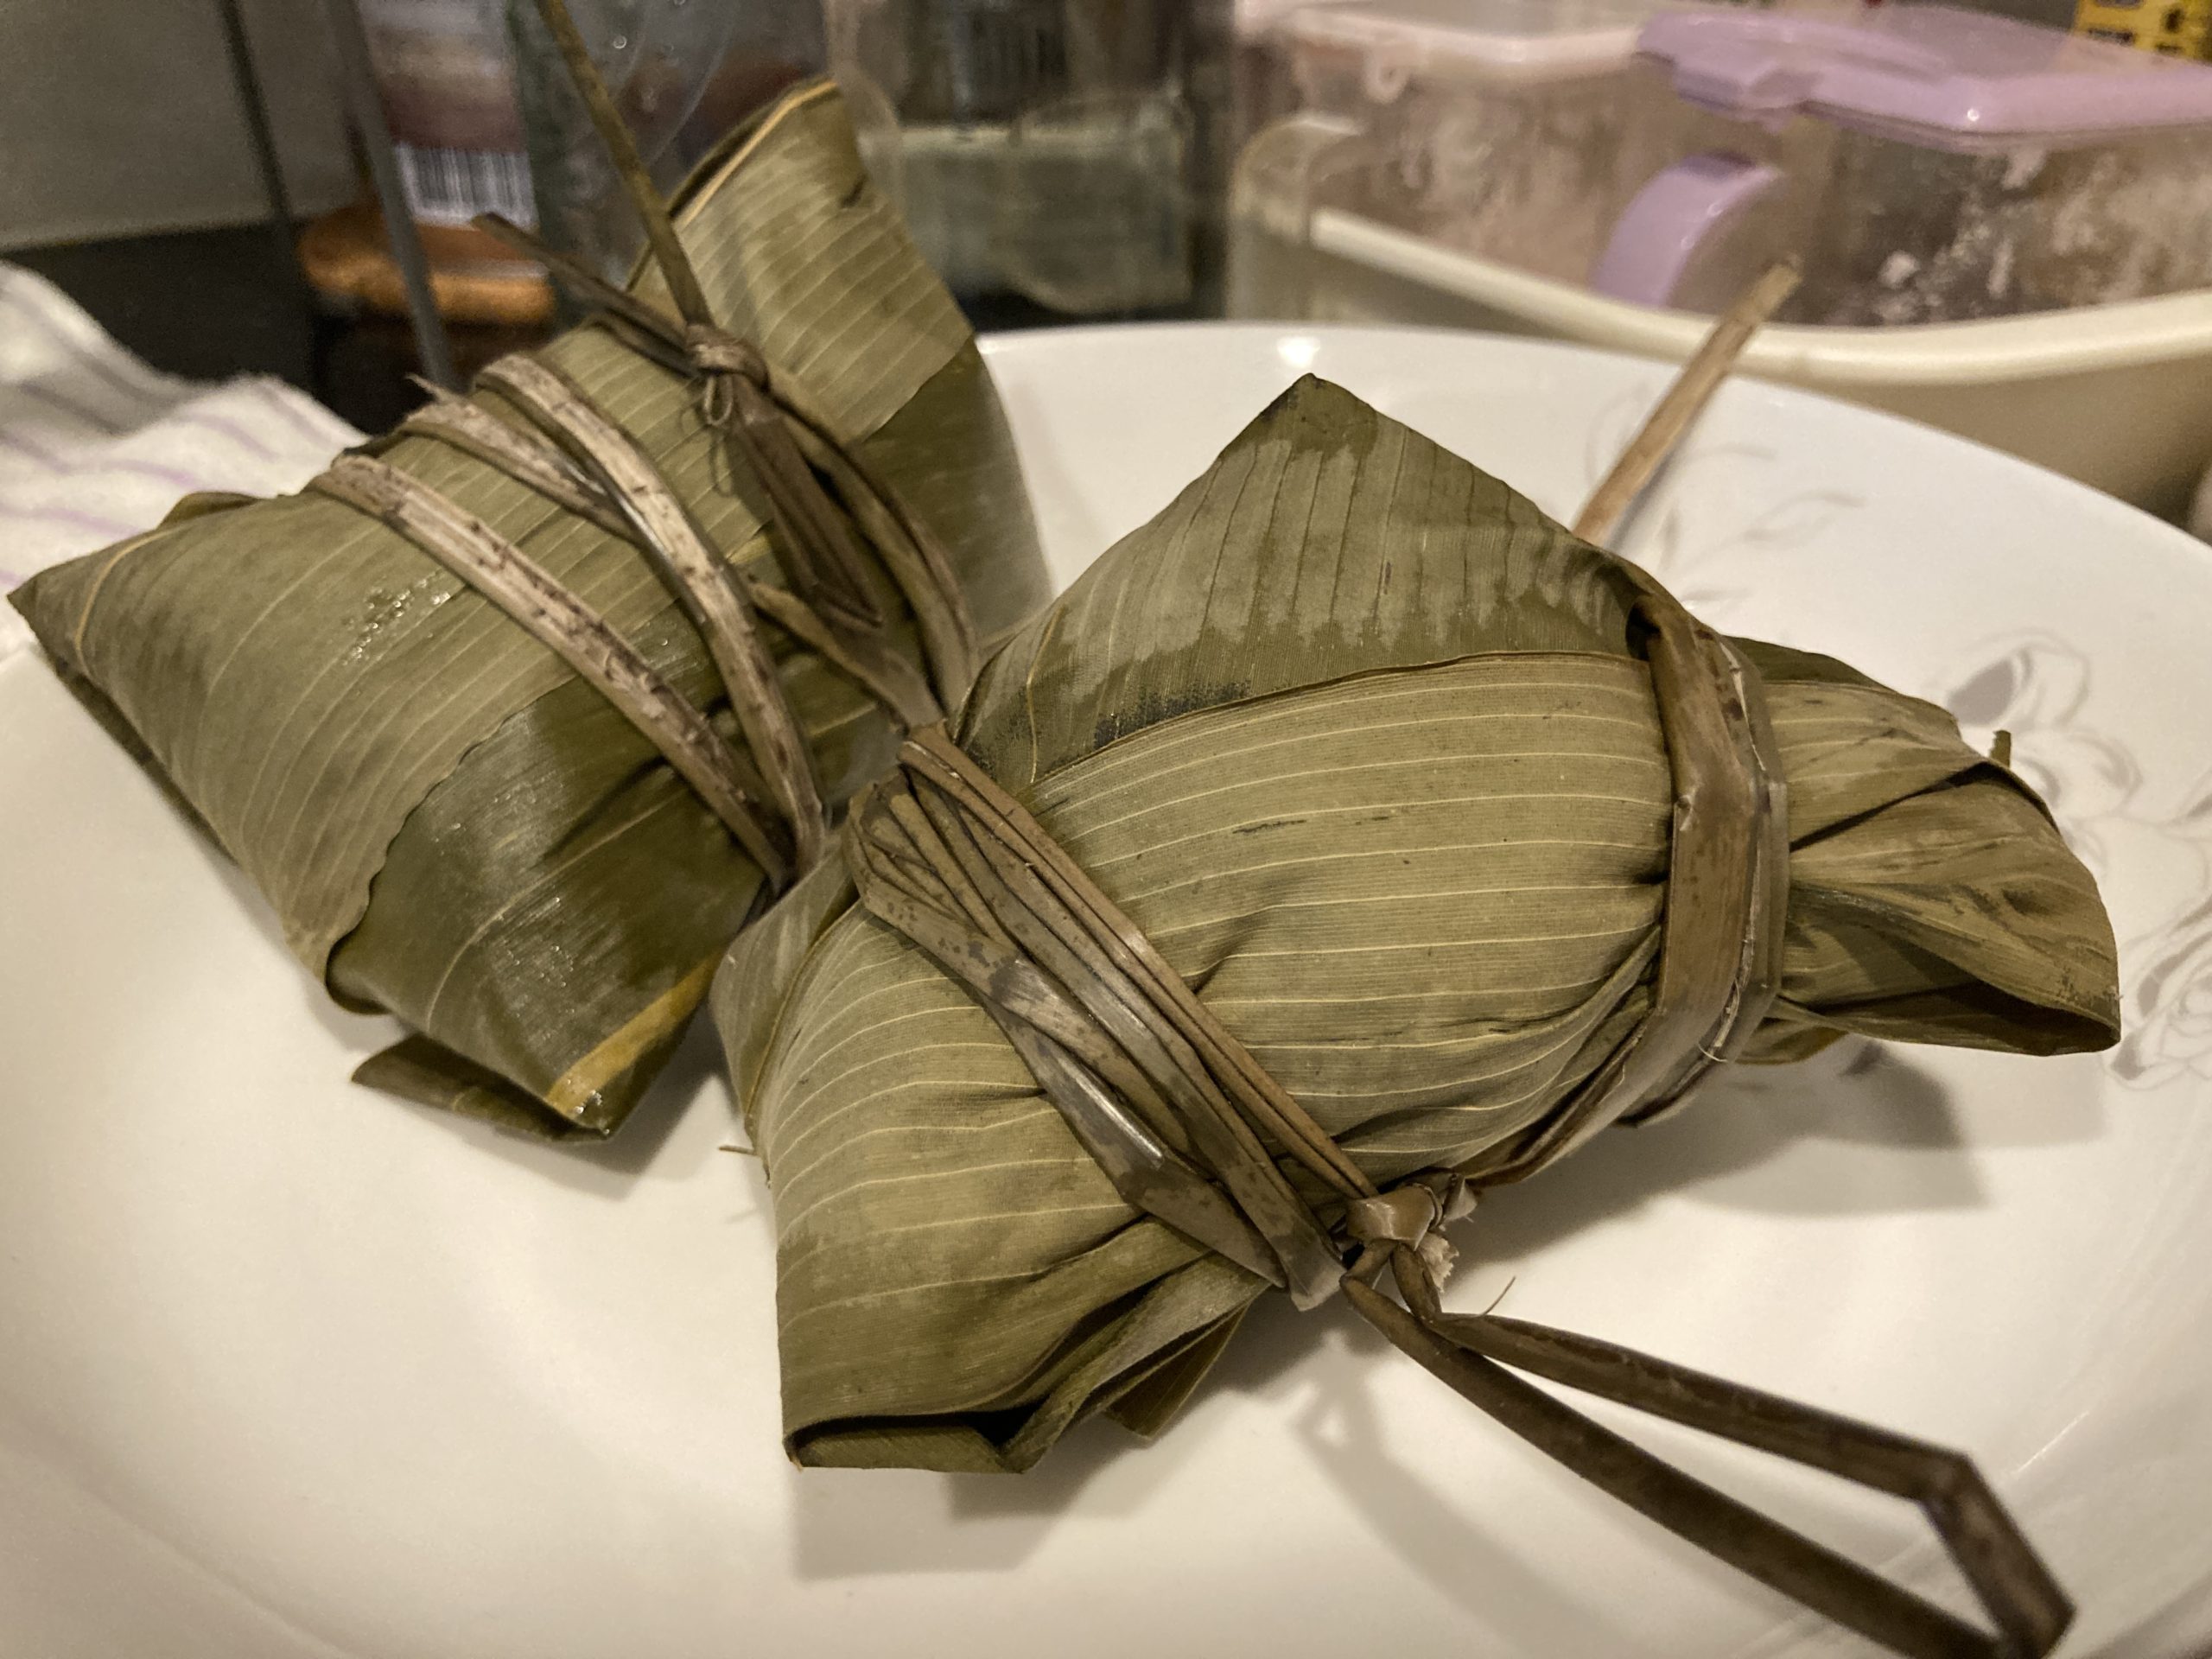
Ta-daa! Not my best shot, but not bad for the first dumpling of the day. You’ll get better and better as you warm up and find your flow.
The Pyramid
Shorter, wider leaves are better for making Pyramids. Some people find this shape more aesthetically pleasing, which is maybe why it’s the shape that most commercially sold zongzi take. Looks aside, you can generally make bigger dumplings with pyramids than with tetrahedrons because they are made with more leaves and enclose a larger volume.
I just learned to make pyramids last year, so I’m not confident enough yet to show them on camera. My aunt has been doing them for years and is an absolute beast at it, and of course my grandma has half a century under her belt. Here’s the master herself demonstrating the Pyramid:


Take two leaves and make an X with them. Take one of those leaves and fold it lengthwise from its tip down to the middle of the crossing. Where the two leaves overlap, have the overlapping leaf follow the lead of the folding leaf, and go along with it. You should end up with a cone with three asymmetric projections sticking out. Does that make sense? I would show more shots, but grandma was in a hurry.


Here’s how you want to hold your cone. Firm but gentle pressure from your fingers to keep the corner sharp and the leaves in place.


Fill as you normally would, then add a reinforcing leaf to each side. One goes between the outer leaf and your palm, and the other goes between the other outer leaf and your fingers. Once the walls have been built up, you can safely finish filling your dumpling

Be mindful of how you distribute your fillings. I find that I have a tendency to overfill the side of the joong facing my palm and under-fill the side towards my fingers, and that leads to the point of the cone being off-center. You gotta imagine it upside down – you’re looking at what will eventually become the bottom of the pyramid.


Fold one side of the wall down, then take some time to adjust. Are the edges parallel? If not, the base of the pyramid won’t be square. Take the other side and fold it down as well.
If you’re making a big dumpling (or you overfilled – it happens), sometimes you need a third reinforcing leaf laid over the rice before you fold the two sides down.


Bring the other two flaps in. Again, take some time to adjust and make sure you’re getting perpendicular edges and right angle corners.

Time to tie it off. Grandma is holding one end of the shichito matgrass in her teeth. You get real good tension that way, which results in really tight and solid dumplings. However, it’s easy to misjudge the tension and break the reed.

Here’s an example of a completed product. You do a couple circles on one side, then circle around and do some more loops around the other side, come back and tie it off. This was my attempt at a pyramid. Note how the point is sad and drooping because I couldn’t maintain the shape of the cone tip and it ended up being under-filled.

From left to right: grandma’s tetrahedron, grandma’s pyramid, and my amorphous lumpy thing. Practice makes perfect, folks!
Troubleshooting
Like my grandma says, all you need to do is make sure that the rice stays inside the dumpling. It doesn’t matter if they turn out ugly because they will still taste great, and it’s all going to look the same anyway coming out the other end. ( ͡° ͜ʖ ͡°)
Having said, there will be times where your dumpling is in danger of falling apart. Maybe a crack developed in a bamboo leaf, or you overfilled it in your novice zeal, or your grip slipped and the leaves came loose. No worries! Take another leaf, slap it over the leak like a piece of Flex Tape and tie it back up.
Cooking Zongzi

Take your wrapped zongzi and place them into a pot. Fill the pot with water and place something heavy on top, like a plate or a smaller lid, to make sure they all stay submerged. Cover, then bring the whole thing to a boil. It’s going to take a good long while, since there’s so much stuff in the pot. Start the clock once the water is boiling, and keep it at a rolling boil for about 2 hours.
While that’s going on, keep working on the rest of the joong. You may need to designate one member of your wrapping party to watch the pots and to prepare snacks. After all, the house is going to fill up with the delicious smell of dumplings cooking, and it’s going to be a long time before you can eat any!
Once the joong have been boiling for two hours, it’s time to take a break from wrapping. Take the dumplings from the top of the pot, cut the strings and peel off the leaves. Cut into the dumplings to make sure their contents are nice and soft. The ones at the top get the least amount of heat, so if they’re done the rest of the batch is also good to go. And since you already have some freshly cooked and unwrapped joong, have a few of them for lunch!
Sometimes you want to mark out some of the zongzi as distinct from the rest. Maybe they’re the malformed, misshapen creations of your inexperienced hands which still taste great, but aren’t that great for giving away. Maybe there are several sticky rice dumplings you customised for your cousin or friend who likes them with some extra salty egg yolk, or maybe they don’t like it with mushrooms and you left them out of theirs.
If there are enough of them, you can boil them separately. Alternatively, you could make them in a different shape, or making some sort of mark on them like tying an extra length of twine onto them, My mother is a vegetarian, so we strung all the vegetarian joong into one massive clump so we didn’t need to keep track of them individually.
Storing Zongzi

On The Counter
This is how things were done back in the old days, before refrigeration. Each dumpling has been individually wrapped and thoroughly sterilised by being boiled in water for more than an hour. They last for days, even weeks at room temperature.
Fortunately, we live in better times nowadays. Even though it’s technically safe to store them on the counter and we have the lived experience of past generations to show for it, I still feel better keeping them in the fridge unless I’m going to eat them within the day.
In The Fridge
Because they’re wrapped in leaves, you don’t need to worry about your sticky rice dumplings absorbing odd odors from the fridge. On the contrary, bamboo leaves have a distinct aroma which can permeate the fridge if you leave them in there for too long. While it is a very delicious smell, you’d do well to keep them in an airtight bag or container to stop that from happening.
In The Freezer
Zongzi freeze remarkably well! They already come wrapped in leaves, so you don’t need to worry about vacuum sealing. In my experience, they don’t suffer from any adverse effects like freezer burn or degradation in texture or taste. Expect them to last months in the freezer and come out tasting as good as the day you made them.
As such, sticky rice dumplings make for an excellent backup food for those days when you need a meal but didn’t plan for it. Like if you are trapped at home because of a storm or heavy rain, and can’t get to the store. Or maybe you have unexpected company and need to add to the table. Or perhaps some of your groceries went bad and you need something to fill the gap. In these situations, you’d be grateful to have several joong in your freezer.
Enjoying Zongzi
Sticky rice dumplings are wonderful simply on their own. The glutinous rice and mung beans get flavoured by the fillings next to them, so each bite tastes different from the last! The rice evolves from being mushroom-y next to the shiitake, to being smoky and meaty around the roast duck, to being rich and savoury beside the salted egg yolk. Some folks like to dip them in a bit of soy sauce, but I rarely find that necessary if you fill your dumplings well.
Have them as a quick breakfast. Bring them on hiking trips and picnics. Take them camping for a pre-packaged, hearty, ready-to-eat meal in one. It’s rice, beans and meat in a convenient and biodegradable package!
Or, you can serve zongzi as a component in a meal. Maybe you made a bunch of Pad Krapao Moo and need a carbohydrate on the side. Or perhaps you made a salad, but want something more substantial to go along with it.
I find that because zongzi are so delicious, it can be tempting to eat more than you probably should. To avoid falling into a food coma two hours later, keep in mind that glutinous rice is very filling, and it tends to absorb water and swell as it sits in your stomach.

Reheating Zongzi
Although sticky rice dumplings are good when served with room temp, the aroma of the bamboo leaves and the various fillings really come alive when they’re eaten hot. There’s no need to unwrap them before you heat them up – in fact, you want them to stay wrapped so that they hold together. Once it’s hot, you can untie (or cut) the knot holding it together, remove the leaves, and dig in.
With the Stove
The most straightforward way to warm up your Jung for eating is to boil them, leaves and all, in a pot of water until they’re heated through.
I can’t give exact times because it depends on the size. If I were to guess, I would say a few minutes if they’re stored at room temperature, 10 minutes if you kept them in the fridge, or 15 minutes or so if they’re frozen.
With the Microwave
You can also reheat Jung in the microwave, although you’d want to defrost them first by moving them from the freezer to the fridge overnight or soaking them in fresh water for an hour or two. Put them in a microwave safe bowl or container along with a good glug of boiling water, cover, and microwave on high for 3 to 5 minutes.

What To Do With The Leftovers
Leftovers are inevitable, because there’s no realistic way to standardise the joong-wrapping process in the home context. When you run out of a particular filling, just leave them out and keep wrapping until you either run out of fillings, rice, mung beans or leaves. You could either get more of what you ran out of and wrap some more zongzi another day, or repurpose the leftovers.
Bamboo leaves and shichito matgrass will last quite a long time if you dry them out under the sun, and store them in a cool dark place. Prepare them just like you did for the first wrapping, and use them to make more Jung or whatever else.
The dried seafood and mushrooms are equally at home in soups, stews and stir fries. Look up other recipes on this website that make use of dried scallops, dried shrimp and shiitake mushrooms.
As for the pork, treat it like you would pork shoulder. Stir fry with vegetables of choice, or sear them and simmer in liquid until tender. One idea might be to stew them in a sauce of sugar, five spice, soy sauce and bay leaves to make Taiwanese Lu Rou meat sauce for serving on rice. I described this in my Lu Rou Fan inspired steak bites post.
The Chinese barbecue is a bit tricky. They’re not going to be very great after sitting around all morning, and Chinese barbecue doesn’t reheat well in general. Despite so, you still need to cook them first before eating them because they might be contaminated by raw meat juice as you go between the different types of filling as you made the zongzi. You could throw them into stir fries or stews where they don’t have to hold up on their own, or make broth with them.
Wrapping Up (pun intended)
Wow, that was a huge post! It took me longer to write up than it did to make (and devour) these sticky rice dumplings, but it was super fun every step of the way. Personally, I look forward to making more of them in the years to come and getting better at them every time.
Anyway, here’s how my family makes zongzi. I hope you also try making them some day!
Keep browsing by categories, or by tags:
Beef Blanching Broccoli Cabbage Carrots Cast iron Chicken Cucumber Curry Daikon Dashi Date Night Dried shrimp Eggplant Eggs Fish and seafood Garlic Ginger Glass noodles Gochujang Honey Miso Napa cabbage Onion Oven Pasta Pork Potatoes Rock sugar Salmon Sesame oil Shiitake mushrooms Shrimp Sous Vide Spicy Steaming Stewing Stir fry String beans Sweet potatoes Teriyaki Thai basil Tomatoes Yogurt Zucchini