How to Make Peanut Butter

Learn how to make peanut butter with just peanuts and sea salt in 5 minutes or less. This creamy, toasty, and healthy spread is so much better than anything you can buy at the store!

If you’re tired of expensive store-bought PB, you really need to know how to make peanut butter at home! Whether you prefer it smooth or crunchy, sweetened or natural, this easy-to-follow recipe has you covered.
Why I love this recipe
Peanut butter is a universally loved spread used extensively in baking, on bread with jam, or even in savory meals like vegan pad thai and West African peanut stew.
The preparation is quick (seriously, about 5 minutes), and you only need peanuts, salt, and a blender! The resulting butter has a rich, creamy texture and a deep, nutty flavor.
Compared to $6 dollar jars at the store, this homemade version is way cheaper and creamier and requires very minimal effort. Plus, it’s naturally vegan, gluten-free, and keto. What more could you need?!
Ingredient notes
With just 2 ingredients required, you can make this peanut butter whenever you need it! Find a full breakdown and suitable substitutes below.

Peanuts
Roasted peanuts form the base of the peanut butter, providing the essential nutty flavor and creamy texture. The quality and freshness of the peanuts will significantly impact the final product, so give them a sniff before using them.
Substitute: For a different flavor profile, you can substitute almonds, cashews, or a mix of nuts.
Salt
Brings out the sweetness of the peanuts while reducing their bitterness. I prefer Himalayan pink salt or sea salt for a slight mineral taste, but regular salt works too. You can leave the salt out if you’re watching your sodium intake.
For a complete ingredient list and step-by-step guide, scroll down to the recipe card.
How to make
Learn the best way to make peanut butter with my straightforward, easy-to-follow instructions. Look for the tips in green throughout this section for consistent and successful results!
Cooking
Step 1
If starting with raw peanuts, you’ll need to roast them in the oven at 350 degrees Fahrenheit until golden brown. If they’re already roasted, you can skip this step.
Roasting peanuts really helps to enhance their nutty flavor and brings out their oils, making blending much easier.

Step 2
Once the peanuts are roasted, add them to a high-speed blender or food processor with a pinch of salt. Pulse to grind the nuts together into a gritty-looking mixture.
I suggest starting with a low salt amount since you can always add more.

Step 3
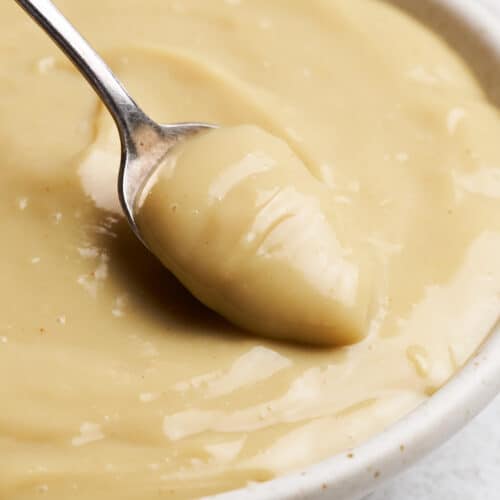
Process the peanuts until they go from a gritty texture to a smooth, creamy spread. Stop and scrape down the sides periodically throughout blending to help move the blades along and give the engine a rest.
It’s pretty critical to use a high-speed blender for this process. Making peanut butter with a regular blender is possible, but it will take a lot longer.

Step 4
Add in any other optional flavors you want and blend to combine. Transfer your homemade peanut butter to a jar or a container for storage or use it immediately. Happy eating!

Expert tip
Opt for high-quality, fresh, dry-roasted peanuts without added salt or seasonings for better control over the sodium and additive content. If you want great-tasting peanut butter, I can’t stress this enough!
You also need to be patient with the blending process. Start at a lower speed to break down the peanuts and gradually increase it to prevent overheating your blender’s engine.
It can take several minutes for the oils to release and transform the mixture into a smooth texture. This is also why it’s so important to roast your peanuts before blending them to kickstart their oil-releasing process.
Serving suggestions
There are virtually endless ways to use homemade peanut butter, from sweet to savory. It’s delicious in baked goods like peanut butter protein balls, vegan peanut butter cookies, vegan sweet potato brownies, and 2-ingredient peanut butter cookies.
You can also use it in savory applications, like my go-to peanut sauce. And, you can’t go wrong with a smear of peanut butter on a piece of dairy-free bread paired with jam, strawberry compote, or this Instant Pot apple butter.
Cooking tips
Clean equipment: Make sure your blender or processor is clean and dry before starting. You don’t want the nuts sticking to the bottom and sides of your equipment.
Let the nuts cool: Allow the roasted peanuts to cool slightly to prevent overheating your blender or food processor.
Pulse them first: Pulse the peanuts in short bursts to break them down evenly.
Scrape the sides: Regularly scrape down the sides of the processor to ensure even blending and a smooth, creamy result.

Frequently asked questions
If you’re planning to use this within a week or so, you can keep it at room temperature. Store it in your fridge if you think it will last longer. The natural peanut oils will become rancid if left too long at room temperature.
If this is your first experience with natural peanut butter, it will taste much different than you expect. To make it sweeter, simply add agave, maple syrup, or cane sugar until you reach your preferred taste.
Ensure you blend the peanuts long enough for the oils to release and create a creamy texture. Different blenders may take longer, so just be patient.
Yes, peanut butter is suitable for celiacs and those who follow a gluten-free diet. For more information, tips, and tricks about eating peanut butter on a gluten-free diet, check out The Helpful GF.
Storing
Your homemade peanut butter will be hot straight out of the blender, so let it cool to room temperature before storing it.
Fridge
Homemade peanut butter should be stored in the fridge in an airtight glass container like a mason jar. Properly stored, it can last for up to 2-3 months.
Freezer
You can freeze homemade peanut butter in a tightly sealed container for up to 6 months. Simply thaw it in the refrigerator when you want more.
More vegan basics


Hungry for more?
If you enjoyed this recipe, please consider leaving a star rating and a comment down below! Your feedback not only helps others discover our blog but also gives us valuable insights from your experience.
Don’t forget to subscribe to our newsletter for the latest recipes, and check out our shop for our top kitchen recommendations. Thank you for supporting BBV!
Recipe

How to Make Peanut Butter (in 5 Minutes or Less)
Equipment
- High speed blender or food processor
- Spatula
- Mason jar with a lid
Ingredients
- 4 cups unsalted and dry-roasted peanuts
- ¾ – 1 teaspoon salt
Add-Ins
- Cinnamon
- Cacao powder
- Agave nectar or maple syrup
- Pumpkin spice
- Chopped peanuts
- Coconut oil
- Chocolate chips
Instructions
- If your peanuts aren't roasted, preheat the oven to 350°F and spread the raw peanuts on a baking sheet. Bake them until they're turning golden brown, about 10 minutes.
- Once the peanuts are roasted, add them to a high-speed blender or food processor with ¾-teaspoon salt.
- Pulse or turn on low for 1 minute to grind the nuts into a gritty-looking mixture. Stop and scrape down the sides and bottom with a spatula or spoon.
- Turn the blender or food processor back on low-medium for another 1-2 minutes. At this point, it will look like a dry peanut clump.
- Stop and scrape down the sides and bottom again, then blend until the mixture appears smooth and glossy, about 2-3 minutes. Taste and adjust the salt if you think it needs it.
- At this point, you can add any other optional flavors you want, and blend to combine. Transfer your homemade peanut butter to a jar or a container for storage. Happy eating!
Notes
Nutrition
Note: I’ve updated this post to include new information and helpful tips about the recipe.

Justine Drosdovech is a food writer, photographer, and one of the founders of Broke Bank Vegan. She is a self-taught plant-based chef but uses her healthcare background to craft dishes that are both delicious and nourishing.