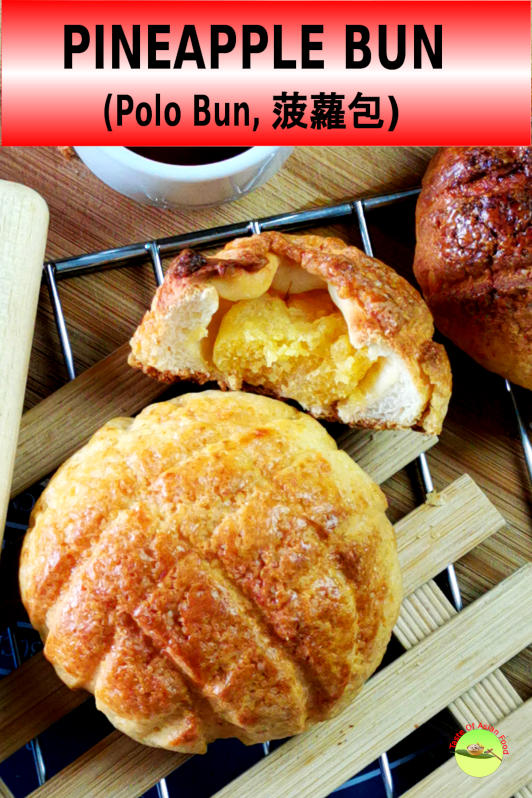
What is an image in your mind of a pineapple bun look like?
You may visualize it as a bun with some pineapple jam as the filling. But in reality, there isn’t any pineapple in the bun.

Eighteenth years ago, I visited a cafe called Polo Bun, serving these pineapple-shaped buns as the main menu item. According to the owner, the name Polo is the translation from the word 菠蘿包 pronounced in Cantonese verbatim, which means pineapple bun.
The name is derived from its shape, resembling a famous pineapple in the Hong Kong-style café.
That café had closed long ago, so I decided to make this Hong Kong style pastry at home. It is even better than most Chinese pineapple bun at Chinese bakeries.
Note: This post may contain affiliate links. Please read my privacy policy for more info. I may receive commissions for purchases made through links in this post. As an Amazon Associate, I earn from qualifying purchases.
How to make the pineapple bun
The pineapple bun (Bolo Bao, Polo bun, Bo Lo Bao) is popular in Hong Kong and available worldwide in the respective Chinatown. As I mentioned, it does not contain any pineapple inside the bun. It is a sweet bun covered with a crumbly crust that tastes like butter cookies. It looks like a pineapple after making a few crisscrossed lines on the topping before baking, and the name has been associated with its shapes forever.
Here are the detailed steps on how to prepare the pineapple bun.
1. Prepare the bread dough
The process of making the dough is quite similar to other buns. You can also use the Japanese milk bread recipe on this blog, but I have simplified it here by omitting the process of making the TangZhong. If you are unfamiliar with buns, refer to the Japanese milk bread recipe for more details. Otherwise, the following information should be sufficient for any regular bakers.
Here are the steps:
- I mix the warm water and instant yeast in a small bowl. Let it stand for five minutes until the yeast is dissolved and activated.
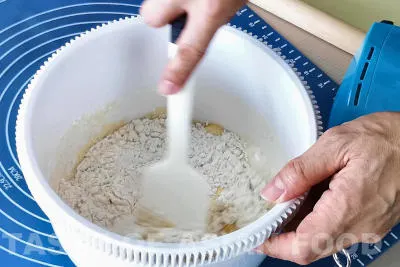
- Next, I measure the bread flour and place it in the mixing bowl, combining the yeast mixture, salt, egg, and sugar with a spatula to form a sticky dough.
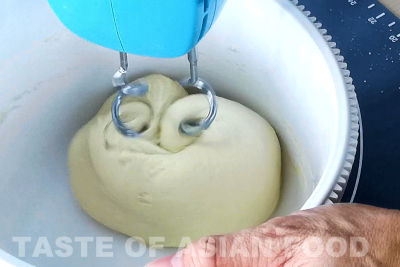
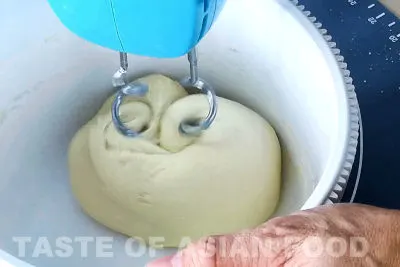
- I use a small stand mixer with the dough hook attached. Mix the dough until it becomes smooth and can pull away from the bowl. This step takes roughly three to five minutes to achieve.
- Next, add the softened butter and continue mixing until all the butter is absorbed. It is easy to work with softened butter as it can incorporate into the dough more quicker. Therefore, I suggest cutting the butter into small cubes before measuring and mixing the ingredients. The butter should become soft when you need it later.
- Continue mixing the dough until it becomes elastic, smooth, shiny, and ultimately pulled away from the bowl. It takes around three minutes to achieve this.
- Now stretch one part of the dough thinly with your finger. It should be able to stretch until very thin and become translucent. This action is called the windowpane test, which checks gluten development. If you can stretch it without breaking, gluten formation is sufficient, and there is no need to knead the dough further.
- Cover the dough with a damp cloth to prevent it from drying. Let it rest at room temperature until it doubles in size, which will take roughly thirty to forty minutes.
Note:
In theory, sugar is the yeast’s nutrient and helps activate it, so it should be added to the yeast first. Also, salt may hinder the development of gluten, and it is best to add it later. From my experience, these effects are minimal, so I mix all the ingredients. The result is good, and the gluten is developed in seven minutes until it passes the windowpane test. The yeast also works fine and can double the size of the dough in forty minutes. The amount of active dry yeast I used was 3g for 250g of bread flour.
2. Shape the dough
You can check whether the fermentation is completed by poking your finger into the dough. This action will form a deep hole without bouncing back if it has doubled in size.
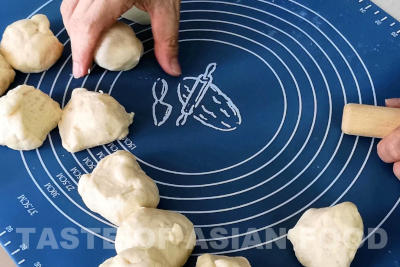
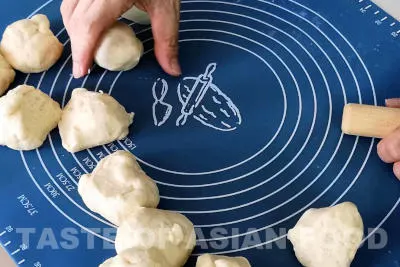
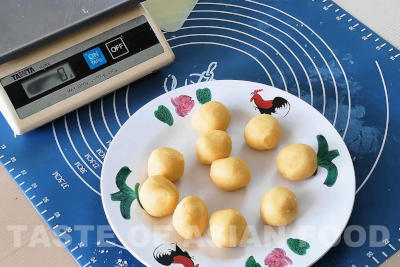
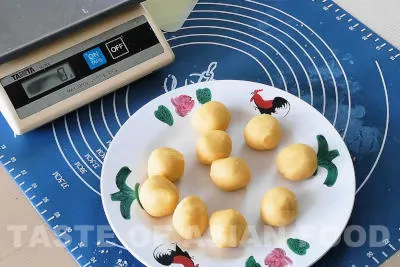
Now you have to decide how big you want the bun to be. I weighed the dough and then divided it into ten portions to make ten buns. You may like smaller ones by dividing them into twelve or fourteen portions.
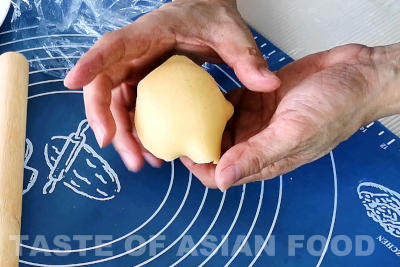
Once you have done that, roll each portion of the dough with your palm to form a smooth ball.
3. Prepare the topping for the pineapple buns
Now it comes to the less conventional part of making this bun- prepare the topping.
Adding a topping to the bun creates a contrasting mouthfeel when you simultaneously bite into the soft bun with the crumbly topping. The feeling is like eating buns and butter cookies in one bite, although this is better!
The topping of the pineapple bun makes it stand out from the clutter. (I can’t think of any other bread or bun with a topping close to it.)
Here are the steps:
- Mix the softened butter and sugar to form a buttercream.
- Add the egg and dry milk powder and combine well.
- Blend the in other dry ingredients to form a dough. Do not over-mix the dough to retain its crumbly texture while eating. It now looks like cookie dough. Some recipes include custard powder, but I find that it is unnecessary.
- The dough is too soft to shape and handle at this moment. Therefore, you need to wrap it in the refrigerator for thirty minutes or until it is firm enough to handle by hand before you use it as a topping.
- Once it is firm, like plasticine, remove it from the refrigerator. Divide the topping into ten equal pieces, and put them into the fridge again if they are too soft.
4. Add the topping to the bread dough and bake
Now it comes to the fun part, i.e., how to neatly place the topping on top of the bread dough and create a pattern resembling a pineapple.
To create the shape of a pineapple:
- Place a topping portion on a cling wrap or plastic wrap, then cover it with another.
- Flatten the topping by pressing it with a dough cutter or the back of a knife. I find that this is the best way to make a perfect circle. Bear in mind that the topping will crack if you force-pressed the hardened topping dough. It works best when firm, like plasticine but not as hard as a solid ball.
- Roll out the topping with a rolling pin to a size enough to cover the bun’s top portion.
- Remove the top layer of the cling film.
- Brush a thin layer of egg wash on the top side of the bread dough. After baking, the egg will act as glue to secure the topping from falling off the bun.
- To put the topping on top of the bun, place the part of the main dough with the egg wash on the topping. Invert the bun so that now the topping is on top.
- Remove the cling film carefully, then wrap the topping around the bun.
- Make three indented lines on the surface with the dough cutter. Turn the dough ninety degrees and indent another three lines. Now the bun has a crosshatch pattern that looks like a pineapple.
To bake the pineapple bun:
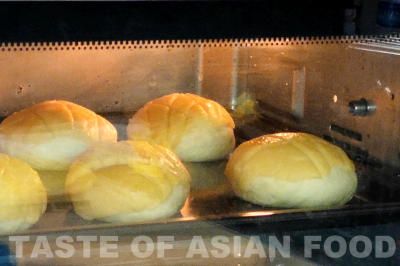
- Finally, apply some egg wash on the surface before baking.
- Arrange the bun on the baking tray with enough space to anticipate they will expand while baking. A baking sheet or parchment paper is unnecessary as the bun will not stick to the pan. Bake at 190°C/375°F for twenty minutes on the middle rack or until the buns turn golden. The exact time required depends on your rack’s position and the oven’s actual temperature. There are no two identical ovens, and it is best to decide when to remove them by visually observing the color.
The buns taste best when fresh from the oven when the topping is still crumbly. This crumbly texture will last for half a day and will start to soften after some time. You can make it crispy and crumbly again by reheating it in the oven or a small toaster.
How to reheat the Polo Buns
The cookie crust on top of the bun will turn soft pretty fast. If you have made the Polo Bun earlier, the best way to make the crust crispy is to put it in the oven for two minutes before serving. Microwave is not an option as it will make it even softer.
Make a pineapple bun with custard filling
You can replace part of the bread dough with some custard filling.
To do this, I reduced the bread dough’s weight by forty percent and replaced it with custard of equal weight. You can check out my easy custard recipe in the snow-skin mooncake article. The mooncake is filled with custard, so you can get the full detail of making the custard over there. Red bean paste is also a popular filling for polo buns.
You must wrap the custard with the pastry before putting on the topping. The rest of the pineapple bun’s steps with custard filling are identical to this recipe.
Other similar Chinese buns with the pineapple bun
Check out the following Asian bread recipes if you like this pineapple bun recipe.
1. Japanese milk bread– This is one of the softest bun recipes I have tried. It takes a little more time to prepare because you need to make the TangZhong, but it is worth the effort if you like soft buns.
2. Pull-apart garlic bread is a unique bread loaf that can be pulled into slices without cutting.
3. Hong Kong-style sausage roll is a dainty small roll with sausage wrapped in bread dough. It is a widely popular item in Asian bakeries.
The pineapple bun recipe
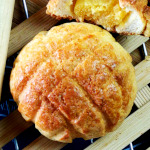
Pineapple bun (菠蘿包, Bolo Bao, Polo bun, Bolo Bao) is a sweet bun cover with a topping that tastes like butter cookies. It looks like a pineapple after making a few crisscrossed lines on the topping before baking, and the name has been associated with its shapes forever.
Ingredients
Bread Dough (A)
- 250g bread flour
- 100 ml of warm water
- 3g of salt
- 25ml of milk
- 30 g beaten egg
- 5g instant dry yeast
- 35g castor sugar
- 20g unsalted butter, softened
Topping (B)
- 55g Unsalted Butter
- 55g castor Sugar
- 20g beaten egg
- 90g regular flour
- 1/2 tsp baking powder
- 10g milk powder
- 1/4 tsp of salt
Instructions
Prepare the dough
- Dissolve the yeast with warm water and milk. Let it stand for five minutes.
- Place the bread flour, yeast mixture, salt, egg, and sugar in the mixing bowl.
- Combine all the ingredients with a fork of a spatula to form a sticky dough.
- Mix the dough (with an electric mixer or hand knead) until it becomes smooth and starts to pull away from the bowl.

- Add the softened butter and continue mixing until all the butter is absorbed. The dough will become more elastic, smooth, and shining and pass the windowpane test.
- Cover the dough and rest at room temperature until it doubles in size.
Shape the dough
- Divide the dough to ten equal portions.
- Roll each portion into the shape of a ball.
Prepare the topping
- Mix the softened butter and sugar until it forms a buttercream.
- Add the egg and milk powder and combine.
- Add the regular flour, salt, and baking butter and combine until it becomes a uniform dough.
- Refrigerate the topping for thirty minutes or until it becomes firm enough to handle by hand.
- Divide the topping to ten equal balls.
Shaping and baking
- Place a portion of the topping on the cling wrap.
- Cover the topping with another cling wrap, then flatten the topping dough with the pastry cutter.
- Roll out the topping to a circle with the rolling pin to a size enough to cover the entire bun.
- Remove the top layer of the cling film.
- Apply a layer of egg wash on the surface of the bun.
- Place the bun at the center of the topping, then invert the bun/topping so that now the topping is on top.

- Make three indented lines on the topping surface, then turn ninety degrees and indent another three lines. Now the bun looks like a pineapple.
- Apply some egg wash on the surface.
- Bake at 190°C/375°F for twenty minutes on middle racks or until the buns turn golden.

Recommended Products
As an Amazon Associate and member of other affiliate programs, I earn from qualifying purchases.
-
 Rolling Pin & Silicon Pastry Mat,Silicone Large Pastry Mat With 19.6" x 15.7",Dough Roller Sleek and Sturdy 11.8" Perfect Match
 -
 Pro Dough Pastry Scraper/Cutter/Chopper Stainless Steel Mirror Polished with Measuring Scale Multipurpose- Cake, Pizza Cutter - Pastry Bread Separator Scale Knife (1)
 -
 Red Star GlutenFree Active Dry Yeast, 0.75 oz, 3 ct, 3 pk
Nutrition Information:
Yield:
10Serving Size:
1Amount Per Serving: Calories: 222Total Fat: 7gSaturated Fat: 4gTrans Fat: 0gUnsaturated Fat: 3gCholesterol: 35mgSodium: 210mgCarbohydrates: 34gFiber: 1gSugar: 9gProtein: 5g
This data was provided and calculated by Nutritionix on 9/25/2020
Elisa Tan
Tuesday 13th of October 2020
Do you have any tips for making a good seal when using custard? I pinched the dough around the custard closed until it looked smooth but it burst when I baked it. I will try again soon, thank you
KP Kwan
Wednesday 14th of October 2020
Hi Elsa, I never try to add custard to the pineapple bun before but made liu sha pao 流沙包 before. I keep twisting the seal as if tightening a screw, and it worked. I hope the same method works for you in this recipe. KP Kwan
elaine
Tuesday 29th of September 2020
It looks delicious. I will give it a try. BTW do you have any recipe on fried sweet potatoes balls, similar to the one at China Town Petaling Street. Not the Taiwn type. Looking forward to it.
Thanks
KP Kwan
Wednesday 30th of September 2020
Haha, Elain I yet to learn how to make it:). Meanwhile head to Petaling Street where the best one is available there.
Goh
Sunday 27th of September 2020
Hi, thanks for sharing! for the Topping, can we replace the milk powder with milk? if so, what should be the measurements? thank you!
KP Kwan
Sunday 27th of September 2020
Hi Goh, This one is a dry recipe so that it will become crumbly after baking. I suggest you omit the milk powder and do not replace it with anything. KP Kwan
KP Kwan
Saturday 26th of September 2020
Hi, this is KP Kwan. I am happy to see you in this comment area, as you have read through my recipe. I am pleased to reply to any questions and comments as soon as possible.