What is katsudon?
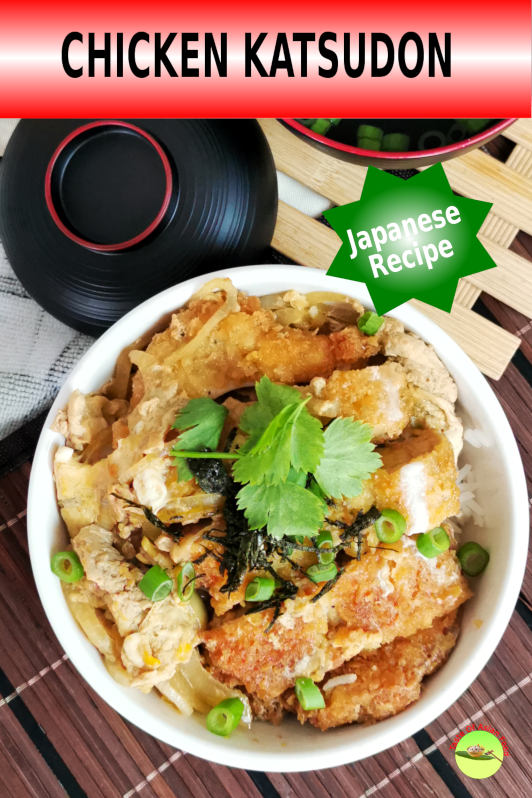
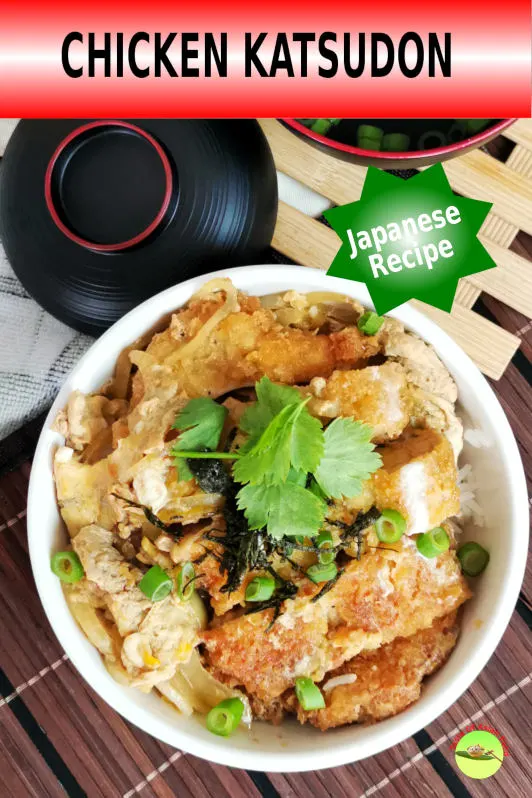
Chicken katsudon is the Japanese rice bowl topped with the delicious torikatsu, sweet onion, and barely set beaten egg bath in umami-rich dashi enhanced with mirin and soy sauce. Katsudon (カツ丼 / Japanese cutlet rice bowl) is relatively easy to prepare.
It is an extension of the torikatsu recipe, ideal as a balanced one-pot meal for lunch and dinner.
So what is torikatsu?
Torikatsu is the name for the Japanese version of deep-fried chicken coated with flour and breadcrumbs, similar to schnitzel. The most popular meat is pork, but chicken and beef are suitable alternatives. I am cooking chicken katsudon today, as the chicken is universal and readily available.-
You can finish cooking within 10 minutes if you have some leftover rice and torikatsu. Its simplicity is the main reason why it becomes a beloved dish for busy home cooks.
I will prepare the deep-fried chicken and dashi from scratch. However, you can take the shortcut by using store-bought dashi powder or substitute it with chicken broth.
Now let’s dive in to explore the details of each step.
Note: This post may contain affiliate links. Please read my privacy policy for more info. I may receive commissions for purchases made through links in this post. As an Amazon Associate, I earn from qualifying purchases.
Why does this recipe work?
This recipe is delicious no matter how you interpret it. The egg is so delicious that you can eat it without adding any seasoning. Once the deep-fried meat and the sweet onion are added, the whole pan will turn into an incredible umami powerhouse.
How to prepare chicken katsudon
Note: Although I am using the chicken to prepare the katsudon, the method is identical if you use pork.
Prepare the dashi
Dashi is the common stock for Japanese cuisine.
If time is allowable, I suggest you prepare the fresh dashi with kombu and katsuobushi. I have a detailed explanation of how to make dashi from scratch in my miso soup article. It is worth making a larger batch of dashi and freezing and portioning it with a few small containers.
If you prefer a straightforward method, substitute it with chicken broth or use dashi powder or ready-make dashi from the supermarkets.
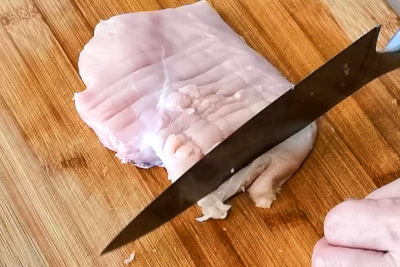
Pound chicken breast
Cut the chicken breast to a thickness of about 1.5cm (0.6-inch slices). This thickness is ideal because if the meat is too thick, the center may not cook when the surface has turned to golden color. If it is too thin, the meat will become dry and tough.
Use a meat mallet to pound the chicken breast gently if the thickness is uneven. It helps to flatten the meat and break down the meat partially to make it more tender. If you do not have a meat mallet, pound the meat by using the spine of the knife.
Once you have flattened the chicken breast meat, season with salt and pepper. I prefer to season it in advance and marinate at least an hour to let the flavor penetrate deep into the meat. Please note that the amount of salt in the recipe serves as a general guideline. The amount depends on the size of the meat. Use 1g of salt for every 100g of chicken breast.
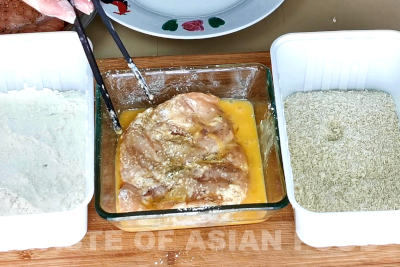
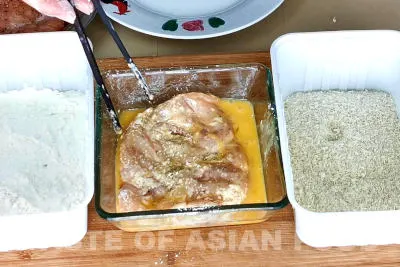
Coat the chicken breast meat with flour, egg, and panko
Now set up the standard three-sectioned breading station.
- The first section is just plain flour. I do not add any cornstarch or baking powder because I’m not looking for the extra crispiness like Taiwanese chicken steak. Once you add the torikatsu to a mixture of dashi and half-cooked egg, it will never be crispy at the end. Cover the marinated chicken breast with flour completely. Remove and shake off the excess flour.
- The second section is the egg wash. Beat the egg and place it in a shadow pan or dish. Place the floured chicken breast in the egg wash and let it pick up the egg liquid. The egg will react with the flour to form a sticky layer on the surface, which ensures the breadcrumbs will stick on the surface firmly.
- The third section is the Japanese breadcrumbs called panko (regular breadcrumbs work just fine). Cover the chicken breast thoroughly with the panko. Set aside the breaded chicken breast.
Before you deep-fried the chicken breast, make sure the bread crumbs thoroughly cover the meat. You can add some additional breadcrumbs right before deep frying. The layers of breadcrumbs, eggs, and flour effectively protect the chicken breast from the hot oil’s direct heat. This method will ensure the torikatsu is nicely brown on the outside and remains tender and juicy inside.
Deep-fried the chicken
We are using an electric deep fryer in our restaurant. However, this is not very practical if you are not deep frying foodstuff often at home.
A better alternative is adopting the shadow frying method. It requires less oil, and you can reuse the leftover oil after filtering through a wire mesh strainer lined with a paper towel.
Pour about half an inch of cooking oil into a pan. Place the breaded chicken breast into the hot oil. You can test the temperature of the oil without r a kitchen thermometer. Drop a small piece of breadcrumb into the oil. The temperature is just right if the breadcrumb sizzles immediately and floats on the surface.
The temperature of the oil should be just right. If it is too cold, the breadcrumbs tend to drop off the chicken. If it is not hot enough, the surface will turn brown too quickly before the interior is cooked.
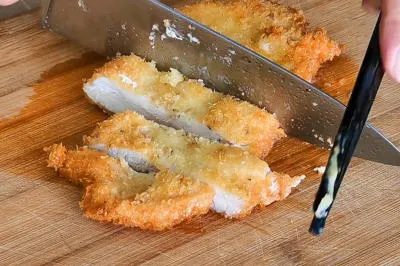
Deep-fry the chicken breast for four minutes on each side or until it turns golden. Try only flip the chicken breast over once to minimize the breadcrumbs from falling off into the oil.
Remove and drain on a kitchen towel.
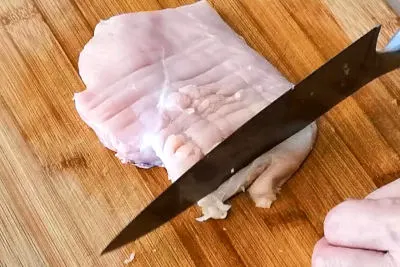
Cut the torikatsu crosswise into 1.5cm (half an inch) slices. Slice through the crispy crust with a sharp knife first, then only cut through the meat. This method can prevent the crust from shattering and ruin the appearance.
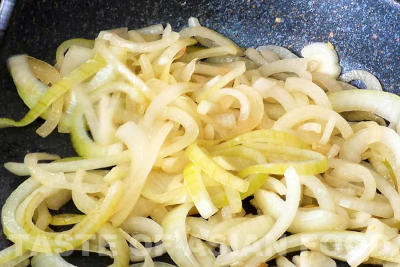
Saute the onion for extra flavor
The torikatsu can be served off the stove immediately. However, we cook it once more with a combination of dashi and egg. If you have leftover torikatsu, skip the previous steps, and move into this section right away.
Slice some onions into small pieces. Add some oil to the pan and saute the onions until it is lightly caramelized. Some recipes skip this step and throw the onion straight into the dashi. I prefer to saute the onions to create more flavor.
Once the onions have turned slightly brown, add the dashi, mirin, sugar, and Japanese soy sauce. Please note that you can also use the Chinese light soy sauce, but the flavor is slightly different.
My golden ratio to make this chicken katsudon soup is 5:1:1:2 of dashi:mirin:sugar:soy sauce.
The specially made donburi pan is ideal to cook the katsudon soup. It is about 16 cm in diameter, which is the best size to cook the torikatsu. The pan has a vertical handle that makes the transferring of the chicken to the rice bowl with ease. But if you don’t have one just like me, just use any ordinary pan with the same size.
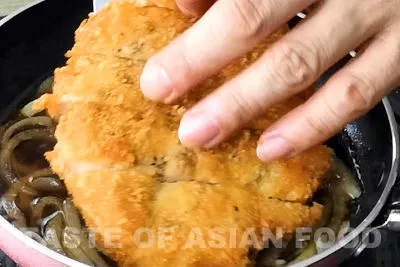
The unconventional soggy combination- breaded chicken, stock, and egg
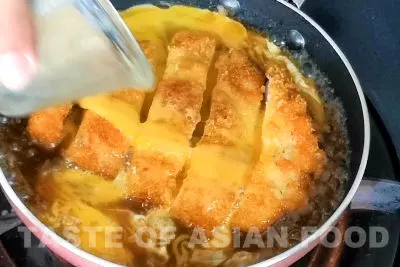
Add the dashi, mirin, sugar and soy sauce to the pan. Add the sauteed onion and wait until it starts to boil. Place the chicken pieces in the pan carefully. Crack an egg, beaten, and drizzle into the soup evenly with a small amount on top of the chicken.
This treatment sounds a bit weird on the surface. What is the logic of soaking the crispy fried chicken into the soup and cooking it further? Regardless of the reason, you have to taste and believe it, savor it, and be hooked with the texture and flavor of this unusual cooking method. Could it be developed accidentally by some innovative home cooks who find ways to reprocess the soggy, leftover torikatsu? I don’t have the answer. All I want to stress is that it is delicious and easy to prepare. The universal appeal is validated by the massive popularity of chicken katsudon, served at nearly every Japanese restaurant anywhere in the world.
Cover and simmer over medium heat for half a minute. Be careful not to overcook the egg to achieve the best result.
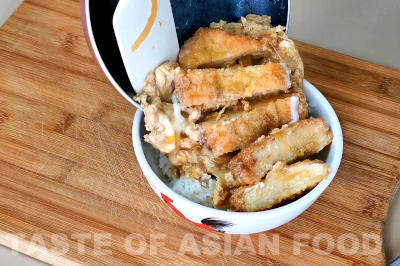
When the egg is set, remove the pan from the stove. Slide the egg and chicken onto a bed of freshly steamed rice.
Garnish with some chopped scallions, mitsuba, and nori.
Chicken Katsudon

Katsudon is the Japanese rice bowl topped with the delicious tonkatsu, sweet onion, and barely set beaten egg bath in umami-rich dashi enhanced with mirin and soy sauce. Katsudon (カツ丼 / Japanese cutlet rice bowl) is relatively easy to prepare.
Ingredients
For the tonkatsu
- 1 piece of chicken breast
- 1/4 tsp salt (or according to the size of the chicken)
- 1/4 tsp black pepper
For the breading station
- Regular flour
- 1 egg
- Panko (Japanese breadcrumbs)
For the soup
- 60ml (1/4 cup) dashi (or chicken stock)
- 1/2 tbsp Mirin
- 1/2 tbsp Sugar
- 1 tbsp Soy sauce
- 1/4 cup sliced onion
- 1 egg egg
Others
- 1 cup cooked rice
- Some mitsuba (or coriander leaves/scallion)
Instructions
- Cut the chicken breast to a thickness of about 1.5cm (0.6-inch slices). Use a meat mallet to pound the chicken breast gently if the thickness is uneven. Season with salt and pepper.
- Coat the chicken breast meat with flour, egg, and lastly panko.
- Pour about half an inch of cooking oil into a pan. Deep-fry the chicken breast for about 4 minutes on each side or until it turns golden.


- Remove and drain on a kitchen towel. Cut the tonkatsu crosswise into 1.5cm (half an inch) slices.

- Saute the onion for extra flavor.

- Once the onions have turned slightly brown, add the dashi, mirin, sugar, and Japanese soy sauce and wait until it starts to boil. Place the chicken pieces in the pan carefully.

- Crack an egg, beaten, and drizzle into the soup evenly with a small amount on top of the chicken.

- Cover and simmer over medium heat for half a minute or until the egg is just set. Slide the egg and chicken onto a bed of freshly steamed rice.

- Garnish with some chopped scallions, mitsuba, or shiso.
Recommended Products
As an Amazon Associate and member of other affiliate programs, I earn from qualifying purchases.


Nutrition Information:
Yield:
1Serving Size:
1Amount Per Serving: Calories: 624Total Fat: 14gSaturated Fat: 4gTrans Fat: 0gUnsaturated Fat: 8gCholesterol: 474mgSodium: 1695mgCarbohydrates: 62gFiber: 2gSugar: 13gProtein: 56g
This data was provided and calculated by Nutritionix on 7/11/2020
Chong Yeok Wah
Wednesday 22nd of July 2020
Thank you very much for the recipes I received. Appreciate if I would continue to receive your recipes as they are awesome
With regards
Chong Yeok Wah
KP Kwan
Thursday 23rd of July 2020
Hi Chong, It is my pleasure to share. If you submit the form (Green background with white words) below each recipe of every article, I will be able to capture your email address and forward any new recipe I uploaded regularly. KP Kwan
KP Kwan
Sunday 12th of July 2020
Hi, this is KP Kwan. I am happy to see you in this comment area, as you have read through my recipe. I am pleased to reply to any questions and comments as soon as possible.