Hummus Pita Sandwiches
These filling Hummus Pita Sandwiches are loaded with nutritious vegetables and ready in just 30 minutes. Perfect for lunch or an easy weeknight dinner!

I’m always on the hunt for quick lunches and dinners. Things that are satisfying and don’t require dirtying lots of dishes. These zucchini and hummus pita sandwiches check all of those boxes and then some.
They’re perfect for busy days when you’re craving something fresh but feel like there’s zero time to make a nutritious meal. Tim and I basically lived off them during the holidays when we were running from one thing to the next.

The recipe features herby roasted zucchini, red bell pepper, and onion piled atop warm pita bread smothered in hummus. A few handfuls of fresh spinach, a sprinkle of salty feta and you’re good to go.
The different flavors and textures meld together for a simple meal that’s light but filling, delicious, and only requires one pan!
How to Make These Yummy Hummus Pitas
1) Get Your Veggies Roasting. Add the chopped vegetables to a roasting pan and drizzle with olive oil. Sprinkle over the seasonings and toss well.

Cook in a 425°F preheated oven or toaster oven until the vegetables are browned and tender, about 15 minutes.
Have extra bell pepper or red onion to use up? Check out our spaghetti squash burrito bowls. They’re a little more involved but so flavorful!

2) Warm Your Pitas. Once the veggies are ready set them aside and add your pitas to the oven, but only for a minute or two. You don’t want them toasted, just warmed up.
I love a pillowy soft pita and always keep a stack in the freezer. They defrost quickly for sandwiches or making a batch of pita chips.
But these ingredients would be equally delicious on naan, a piece of toast, wrapped in a tortilla, or piled on a pair of quick baked sweet potatoes.

3) Time to Assemble. Spread each pita with hummus. Plain, roasted red pepper, or garlic hummus are all good options. Pretty much any flavor (except that chocolate dessert-style hummus) will be tasty.
Then layer on the spinach (arugula, mixed greens, or any kind of lettuce), the cooked veggies, and lastly the feta.
Recipe Tips
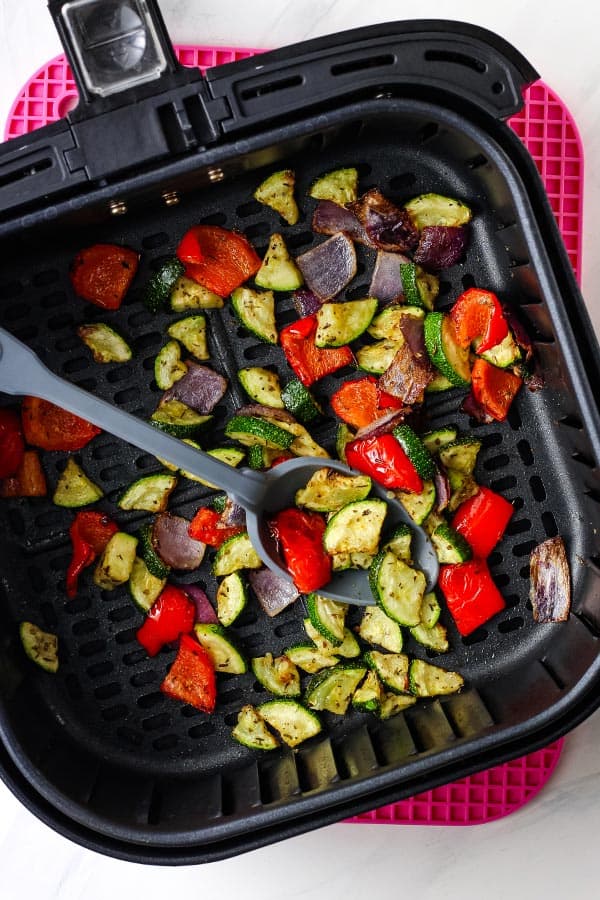
Use an Air Fryer: Preheat the air fryer for a few minutes at 400°F. Then add the veggies and cook for 8 to 10 minutes, shaking the basket once or twice.
Change Up The Vegetables: You can swap them for what’s in season and/or already in your fridge. Sliced mushrooms, chopped asparagus, or halved cherry tomatoes would taste great and will cook in the same amount of time.
Meal Prepping: If you’re looking to make this recipe ahead for lunches, roast the vegetables then store the remaining ingredients separately until you’re ready to assemble.

Hummus Pita Sandwiches
Warm pitas with hummus, feta, and savory roasted vegetables. Perfect for lunch or a light dinner for two!
Ingredients
- 1 small Zucchini Squash, (5-6 ounces)
- 1/2 cup Diced Red Bell Pepper, (about half a large pepper)
- 1/2 cup Chopped Red Onion, (about 1/4 a large onion)
- 2 teaspoons Olive Oil
- 1/4 teaspoon Dried Oregano
- 1/4 teaspoon Dried Thyme
- 1/4 teaspoon Garlic Powder
- Salt and Pepper, to taste
- 2 Whole Wheat Pitas
- 1/2 cup Prepared Hummus
- 1 1/2 cups Fresh Spinach, (2 handfuls)
- 2 tablespoons Crumbled Feta Cheese, (about 1 ounce)
Instructions
Roast the Vegetables:
- Preheat the oven to 425°F. If using a toaster oven, adjust the cooking rack to the lowest placement and select the BAKE setting.
- While the oven preheats, quarter the zucchini lengthwise and then cut into 1/2-inch thick pieces. Cut the bell pepper and onion into 1-inch thick pieces.
- Add the vegetables to a roasting pan. Drizzle with oil and sprinkle over the oregano, garlic powder, and salt and pepper, to taste. Toss to combine.
- Roast vegetables for 10 minutes. Carefully remove the pan and stir. Return pan to oven and continue cooking until the vegetables have softened and started to brown, about 5 minutes more. Remove from the oven and set aside.
Warm the Pitas:
- Reduce the temperature to 375°F and warm the pitas by placing them directly on the cooking rack for 1 to 2 minutes.
Assembly:
- Spread the warmed pitas with hummus. Layer with spinach, roasted vegetables, and crumbled feta.
- Dig in!
Notes
Air Fryer Vegetables: Preheat the air fryer for a few minutes at 400°F. Add the oiled and seasoned veggies and cook for 8 to 10 minutes, shaking the basket once or twice, until the vegetables are tender (but not mushy). *As air fryers do vary, if you find the vegetables are browning too quickly, try using a lower temperature like 380°F or 390°F.
Nutrition Information:
Yield: 2 Serving Size: 1Amount Per Serving: Calories: 432Total Fat: 19.8gSaturated Fat: 5.1gCholesterol: 13mgSodium: 788mgCarbohydrates: 53.3gFiber: 11.5gSugar: 5.7gProtein: 14.8g
More Delicious Vegetarian Sandwiches
Around the TOL house, we’re all about sandwiches and wraps. Especially, a crispy toaster oven grilled cheese. If you’re a fan of easy throw-together meals too, here are a few more tasty ideas:
Trying this today! This came across my Pinterest feed. So simple and savory. I’m going to add farro and make a bowl for my husbands lunch tomorrow with the leftovers. I have a big family and use my toaster over all the time since it’s more efficient than heating up a large oven. Thank you for this web site and your content!
Ooh, some nutty farro sounds like a fantastic addition! I hope you guys enjoy the recipe and thanks so much for taking the time to leave such a nice comment, Jill. It’s always fun to hear from someone who loves to cook with their toaster oven too 🙂
Happy Cooking!
Brie