
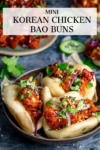

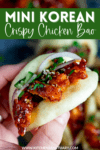

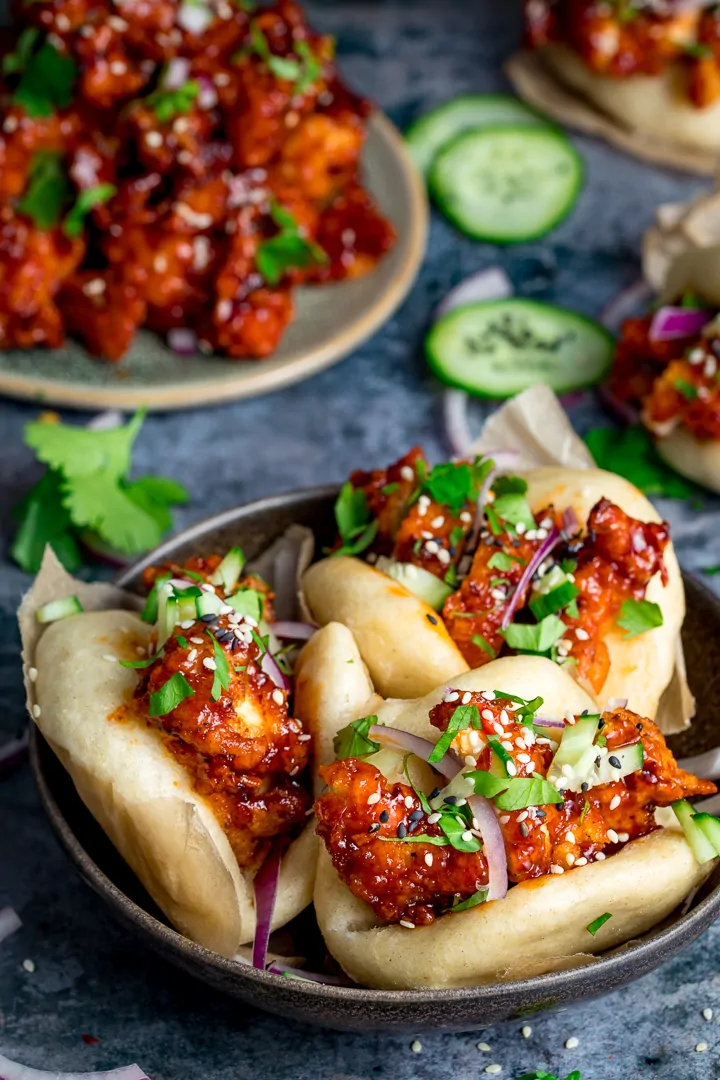
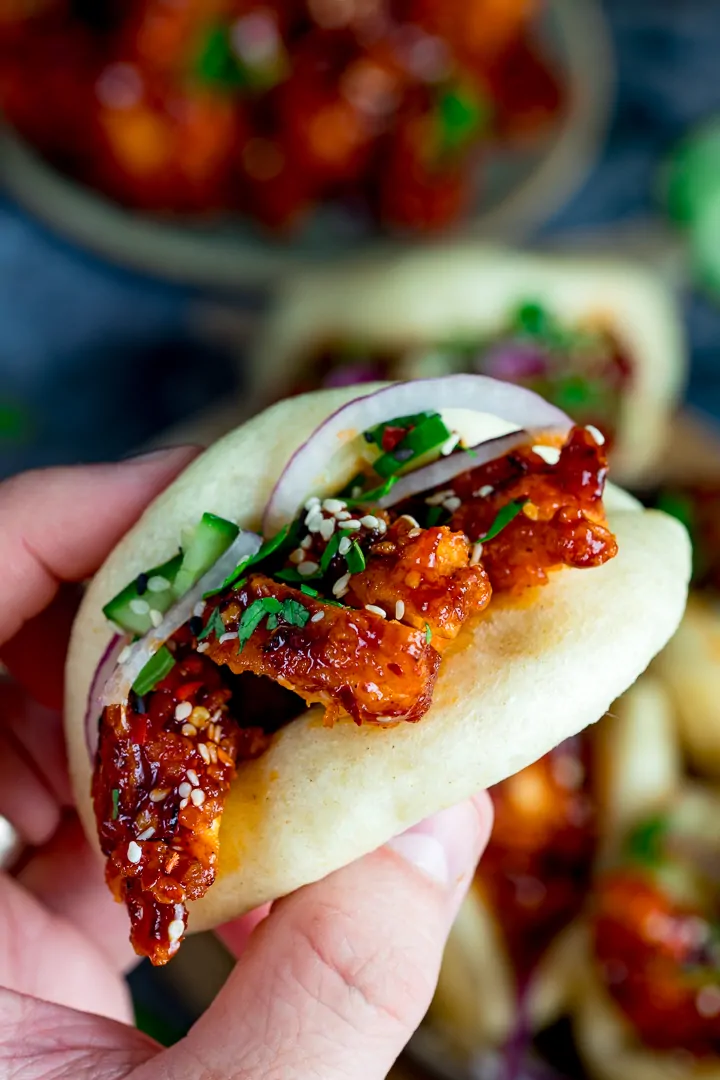
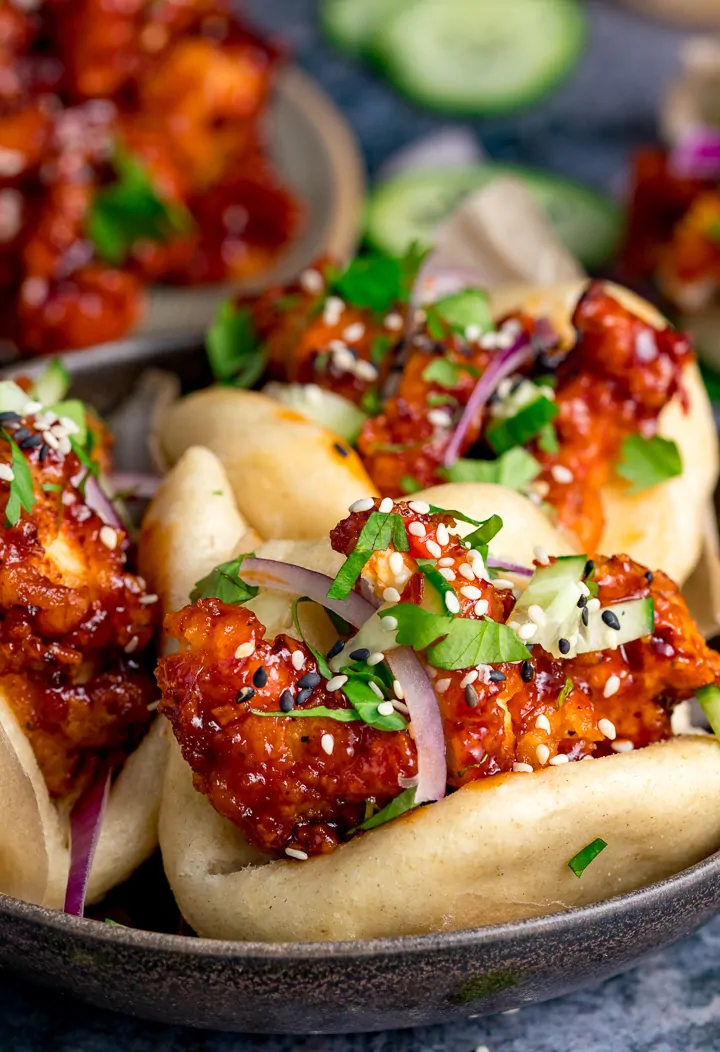
Looking for a really impressive and grown up party food? Soft and fluffy steamed mini bao buns filled with crispy Korean chicken are the answer! Everyone raves about them when I make them.
I’d love to tell you these Korean Chicken Bao Buns are really quick to make, but I’m gonna say it right now. They do take a bit of time and effort. The recipe itself is easy, there are just quite a lot of steps and a bit of proving time.
It really is worth it though. Make them as a Christmas party food, make them for dinner, make them for an indulgent lunch. You will not be disappointed!
I start off making dough for the buns:
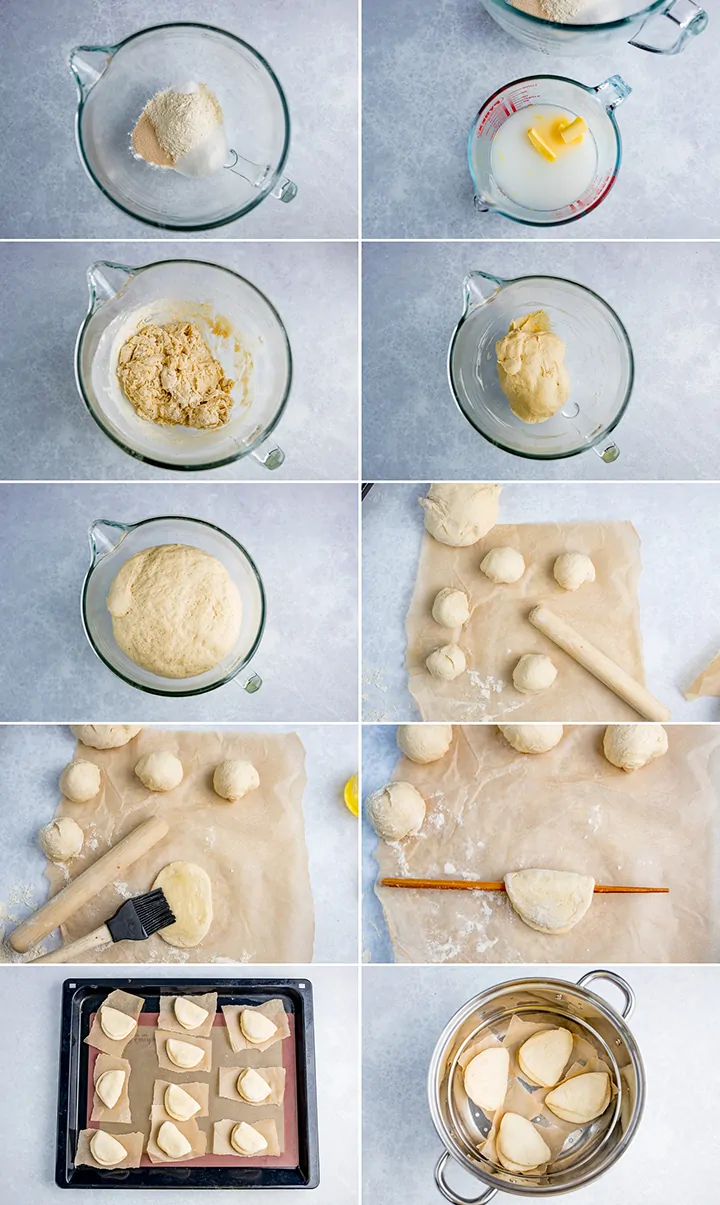
- Add flour, sugar, salt and yeast to a bowl and mix
- Add milk, warm water and butter to a jug and stir until the butter melts
- Stir the liquid into the the flour mixture
- Knead the dough for 10 minutes, then place in a bowl to rise
- Leave for 90 minutes or so until doubled in size
- Knead again and divide into 20 balls
- Roll out each ball into an oval and brush with oil
- Fold the dough over, using a chopstick in the middle to leave a little space in the fold
- Place on a baking tray to rise for 60 minutes or so, until puffed up
- Steam in a steam pan for 10 minutes.
I’ve written (and tested) this recipe using my steam pan.(<– affiliate link). If you don’t have one, I thoroughly recommend getting yourself one. I use mine all the time for steaming veggies. They’re stack-able, so you’re saving hob space too – which is very useful when you’re making something with multiple dishes – like a good old roast beef dinner.
I normally start marinading the chicken when the buns are going through their first prove. Then I shape the bao buns and let them prove a second time. Then I fry the chicken at the same time as I start steaming the bao buns.
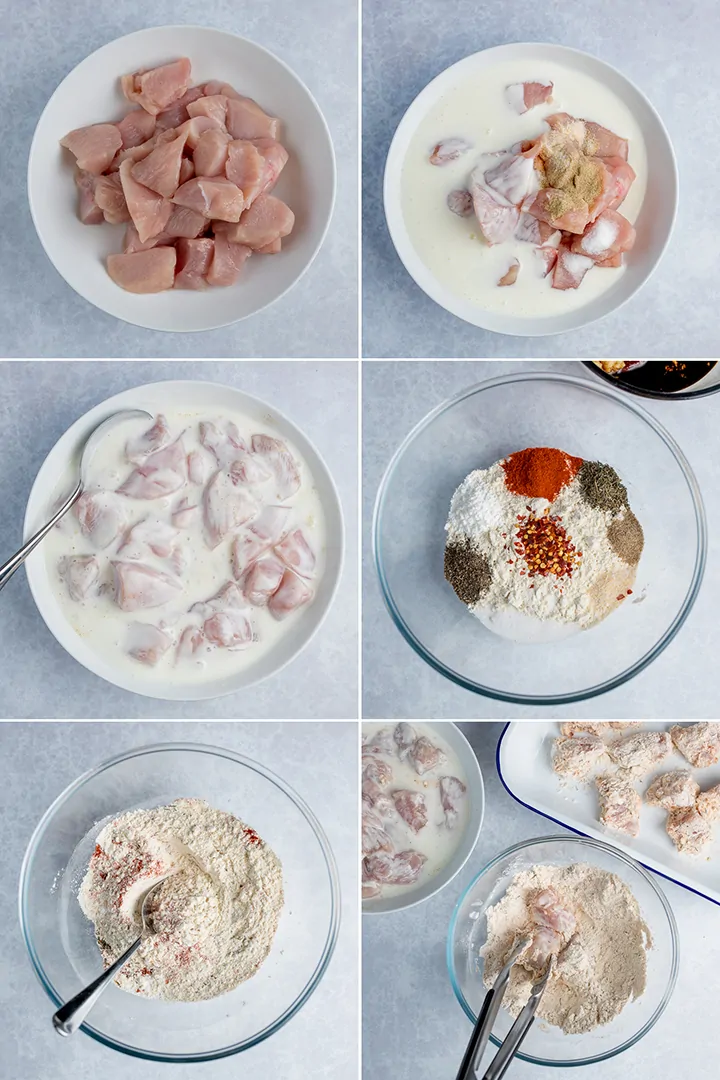
For the chicken:
Marinade the chicken in buttermilk, salt, white pepper and garlic salt for at least an hour.
Then we coat the chicken in my special crispy chicken mixture (check out the recipe card for the full list of ingredients).
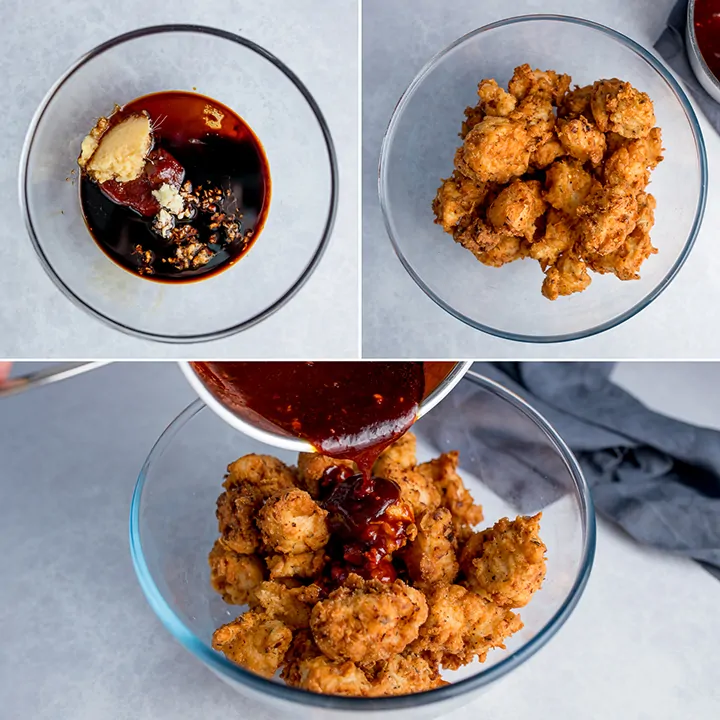
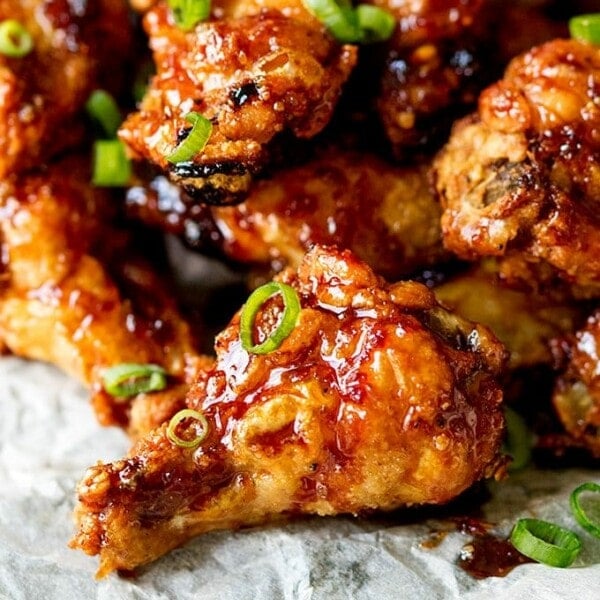
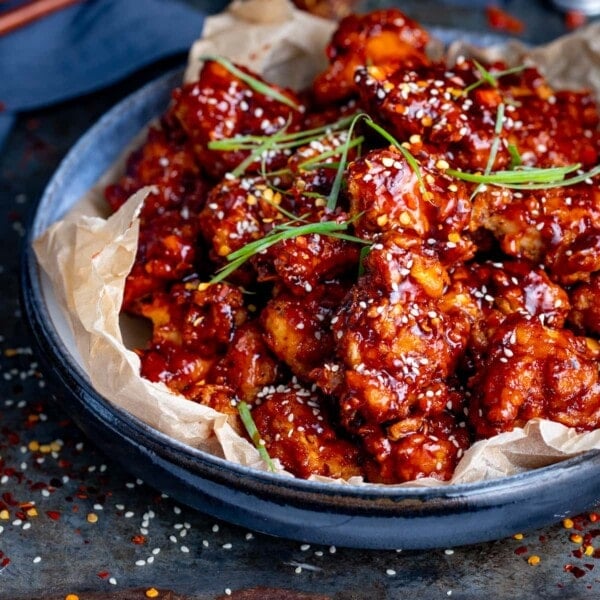
The chicken is then fried, before being coated in spicy gochujang sauce. This is a mixture of gochujang paste (<– affiliate link), honey, brown sugar, soy sauce, garlic and ginger that’s been bubbled together until sticky and syrupy.
Pour the mixture over the crispy chicken toss together:
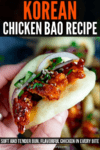
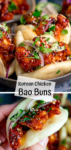
Carefully open the steamed bao buns and stuff with the Korean chicken. Top with slices of red onion, fresh coriander (cilantro), cucumber and sesame seeds before serving.
I’ve got a few tips in the recipe card below if you’d like to make any parts of the recipe ahead of time.
What is gochujang?
Gochujang is a Korean fermented red chilli sauce or paste with a smoky-sweet and slightly spicy flavour. Some brands are spicier than others. I prefer the paste, rather than the sauce for a stronger flavour. It’s a fantastic addition to sauces and marinades, as it adds heat, richness, tang and a little sweetness. I use it in lots of recipes (beef bulgogi, Pork ramen, Korean steak grilled cheese, sticky Asian ribs to name a few).
More Party Food Ideas:
- Vegetarian Sausage Rolls
- Asian Chicken Lettuce Wraps
- Spicy Lamb Samosa Cups
- Crispy Fried Ravioli with Spicy Tomato Dip
- Tear and Share Sausage Rolls
- Cranberry Brie Bites
The Korean Chicken Bao Video:

Love Street Food like this? How about these Street Food ideas:
- Pork belly Bao Buns (Gua Bao)
- Chicken Satay with Spicy Peanut Sauce
- Pad Thai with king prawns
- Pork Gyros with homemade tzatziki
- Canadian Poutine with rich gravy
- Asian Sticky Chicken Wings – or cauliflower wings for a vegetarian version
- Crispy fish tacos with pico de gallo
The Korean Chicken Bao Recipe:

Korean Chicken Bao
Ingredients
Bao Buns:
- 450 g (3 3/4 cups) plain (all-purpose) flour
- 2 tbsp caster sugar
- ½ tsp salt
- 2 tsp (equivalent to one packet or 7g) instant dried yeast
- 3 tbsp whole milk
- 210 ml (3/4 cup + 2tbsp) warm water
- 3 tbsp unsalted butter very soft
- 1 tbsp olive oil
Chicken and marinade:
- 4 chicken breasts sliced into bite-size chunks
- 240 ml (1 cup) buttermilk
- ½ tsp salt
- ¼ tsp white pepper
- ¼ tsp garlic salt
Crispy Coating:
- 180 g (1 1/2 cups) plain (all-purpose) flour
- 1 tsp salt
- 1 tsp ground black pepper
- ½ tsp garlic salt
- ½ tsp celery salt
- 1 tsp dried thyme
- 1 tsp paprika
- 1 tsp baking powder
- 1 tsp chilli flakes
- vegetable oil for deep frying at least 1 litre/four cups
Korean Sauce:
- 2 tbsp gochujang paste
- 2 tbsp honey
- 4 tbsp brown sugar
- 4 tbsp soy sauce
- 2 cloves garlic peeled and minced
- 2 tsp minced ginger
- 1 tbsp vegetable oil
- 1 tbsp sesame oil
To Serve:
- 1 small red onion thinly sliced
- ¼ cucumber chopped into small pieces
- small bunch of fresh coriander cilantro, roughly chopped
- 2 tsp black and white sesame seeds
Instructions
- Start by making the bao buns.
- Place the flour, sugar, salt, and yeast in a bowl and mix together.450 g (3 3/4 cups) plain (all-purpose) flour, 2 tbsp caster sugar, ½ tsp salt, 2 tsp (equivalent to one packet or 7g) instant dried yeast
- Add the milk, warm water, and butter to a jug and stir together until the butter melts. Stir the liquid mixture into the flour mixture at first with a spoon, and then with your hands. Turn out onto a floured surface and knead for 10 minutes. Alternatively, you can do this in a mixer fitted with a dough hook.3 tbsp whole milk, 210 ml (3/4 cup + 2tbsp) warm water, 3 tbsp unsalted butter
- Place the dough in an oiled bowl. Cover (with clingfilm or a damp tea towel and leave to prove until doubled in size - about 90 minutes - 2 hours).
- Meanwhile, start on the Korean Chicken. Place the chicken in a bowl. Add the buttermilk, salt, pepper and garlic salt. Mix together, cover and place in the fridge to marinade for at least 1 hour.4 chicken breasts, 240 ml (1 cup) buttermilk, 1/2 tsp salt, 1/4 tsp white pepper, 1/4 tsp garlic salt
- After the dough has proved, tip it out of the bowl onto a floured surface. Knead the dough again and split it into 20 balls. Place a piece of baking parchment on your work surface and roll each ball into an oval on top of the parchment, using a rolling pin – approx. 6cm x 9cm.
- Brush the ovals with the olive oil and fold each oval over, using a chopstick in the middle to fold over to leave a little space in the fold (so the oil is on the inside of the fold). Remove the chopstick and place each bun onto a small piece of baking parchment.1 tbsp olive oil
- Place the buns on the trays - still on the the baking parchment - as this will help you to move them later. Cover each tray with clingfilm or a carrier bag (ensuring the clingfilm doesn't touch the dough - or it will stick) and leave to prove for a further hour, until puffed up.
- Preheat the oven to a low heat (to keep the cooked chicken warm). Heat a large pan of vegetable oil (or preheat your deep fat fryer) until hot (you can test by dropping a small cube of bread in there, if it rises immediately to the top and starts to bubble rapidly, it’s hot enough). You’ll need at least 1 litre (4 cups) of oil.vegetable oil for deep frying
- Mix together the crispy coating ingredients in a small bowl. Take the chicken out of the fridge. Lift a piece from the buttermilk and allow the excess to drip off. Dredge the chicken in the crispy coating mixture – ensuring it’s fully covered. Place on a tray and repeat until all of the chicken is coated.180 g (1 1/2 cups) plain (all-purpose) flour, 1 tsp salt, 1 tsp ground black pepper, 1/2 tsp garlic salt, ½ tsp celery salt, 1 tsp dried thyme, 1 tsp paprika, 1 tsp baking powder, 1 tsp chilli flakes
- Once the oil is hot enough, add in 10-12 of the chicken pieces. You can add more or less depending on the size of your pan, just be sure not to overcrowd the chicken. Cook for 3-5 minutes until golden brown and cooked in the middle. You can check this by cutting open a piece of chicken, if it’s no longer pink in the middle, it’s cooked.
- Place on a tray in the oven to keep warm whilst you cook the rest of the chicken.
- Meanwhile, put a large steamer pan on to boil. Working in batches, place the buns in the steamer (you can keep them on the baking parchment and steam for 10 minutes. I use a double-layer steam pan - placing four buns in each layer. Once steamed, place on a warm plate.
- While the chicken and bao buns are cooking, make the sauce. Place the gochujang, honey, sugar, soy sauce, garlic, ginger, vegetable oil and sesame oil in a saucepan and stir together.2 tbsp gochujang paste, 2 tbsp honey, 4 tbsp brown sugar, 4 tbsp soy sauce, 2 cloves garlic, 2 tsp minced ginger, 1 tbsp vegetable oil, 1 tbsp sesame oil
- Bring to the boil, then simmer for 5 minutes until thickened.
- Place all of the cooked chicken in a bowl and pour the sauce over the chicken. Toss together to coat. You can leave the chicken chunks whole, or slice up if you prefer.
- Carefully open the steamed bao buns and stuff with the Korean chicken. Top with slices of red onion, cucumber, fresh coriander (cilantro), and sesame seeds before serving.1 small red onion, 1/4 cucumber, small bunch of fresh coriander, 2 tsp black and white sesame seeds
Video
Notes
Can I make this recipe ahead?
Yes - you can make and cook the crispy chicken, make up the sauce and cook the bao buns ahead of time.When you're ready to eat, heat up the chicken in the oven and heat up the sauce in a pan. Then toss the chicken with the sauce.
Reheat the buns (in a steam pan or microwave) and assemble everything together right before serving. See tips below on making each element ahead of time, including storage and reheating.
Tips on making the bao buns ahead:
Yes, make the buns, then quickly cool, cover and refrigerate (for up to 2 days). Allow to come to room temperature before reheating. You can reheat (keep them covered) in the microwave for 15-20 seconds each bun. Or you can steam them for 4-5 minutes to reheat.Can I freeze the Bao Buns?
Yes, make the buns, then quickly cool, cover and freeze. Defrost overnight in the refrigerator and allow to come to room temperature before reheating. You can reheat (keep them covered) in the microwave for 15-20 seconds each bun. Or you can steam them for 4-5 minutes to reheat. You can also reheat the bao buns from frozen, by placing them in the steamer for 5-6 minutes, until hot throughout.Tips on making the Korean fried chicken ahead:
I prefer this Korean fried chicken served right away, as that’s when the chicken will be at it’s crispiest. However, you can cool, cover and refrigerate the Korean fried chicken (for up to a day), then reheat in the oven (covered) for 10-15 minutes at 190C/380F, until piping hot throughout. If you want to keep the chicken crispy, then fully cook both the crispy chicken and sauce, then cool and cover (keep the sauce separate from the chicken) and refrigerate for up to a day. Then reheat the chicken in the oven, uncovered, for 10-12 minutes at 190C/380F, until piping hot throughout. Reheat the sauce in a pan until piping hot and then toss the chicken in the sauce.Can I bake the chicken rather than fry it?
If you want baked chicken, then follow the recipe for my baked chicken tenders, and mix with the spicy gochujang sauce.I have a steam oven - can I make bao buns that rather than a steam pan?
So long as it's a full-steam oven (not a combi-steam), then yes. Place the mini buns on trays lined with baking parchment and steam for 8-10 minutes on 100C/210F full steam until puffed up.If your steam oven has a bread proving function, you can also use this function to prove the buns too. This will take 30 minutes for the first prove and 20 minutes for the second prove. Nutritional Information is per Korean Chicken Bao and is approximate. Note - it's difficult to work our the amount of oil used during the deep frying process, so I've estimated that 1/2 cup (120ml ) of oil was used/absorbed altogether for 20 servings.
Nutrition
Nutrition information is automatically calculated, so should only be used as an approximation.
Some of the links in this post may be affiliate links – which means if you buy the product I get a small commission (at no extra cost to you). If you do buy, then thank you! That’s what helps us to keep Kitchen Sanctuary running. The nutritional information provided is approximate and can vary depending on several factors. For more information please see our Terms & Conditions.


It is BEYOND AMAZING to see the measurements for the ingredient WITH THE STEP in the instructions!!!! I need everyone to do this with online recipes! THE DREADED SCROLLING UP AND DOWN AND UP AND DOWN. I could kiss you for that alone! If it didn’t have that, especially with a recipe as detailed as this, I wouldn’t have even attempted to make this!
But, I did, and MY OH MY! This is something special. Absolutely love this. Made as is, with no alterations to the recipe and this is phenomenal!
Cool, grey, winter day in the northeast today. This was the perfect new recipe to give a go. This is truly one of the best flavor profiles I’ve ever tasted. My husband asked me to please move the platters before he could eat everything in sight. Will definitely make this again (and again). Thank you!
One of the best dishes we’ve made in a while. Everyone loved it!! Kids too! (We used 1/2 the chili/pepper called for, just in case, and if someone wanted it hotter, they could add sambal after.) Well written recipe! And seasoned perfectly! This is going into our regular rotation!!
Absolutely fantastic recipe. So flavourful! My family loved it! It is a little fussy, but so worth it.