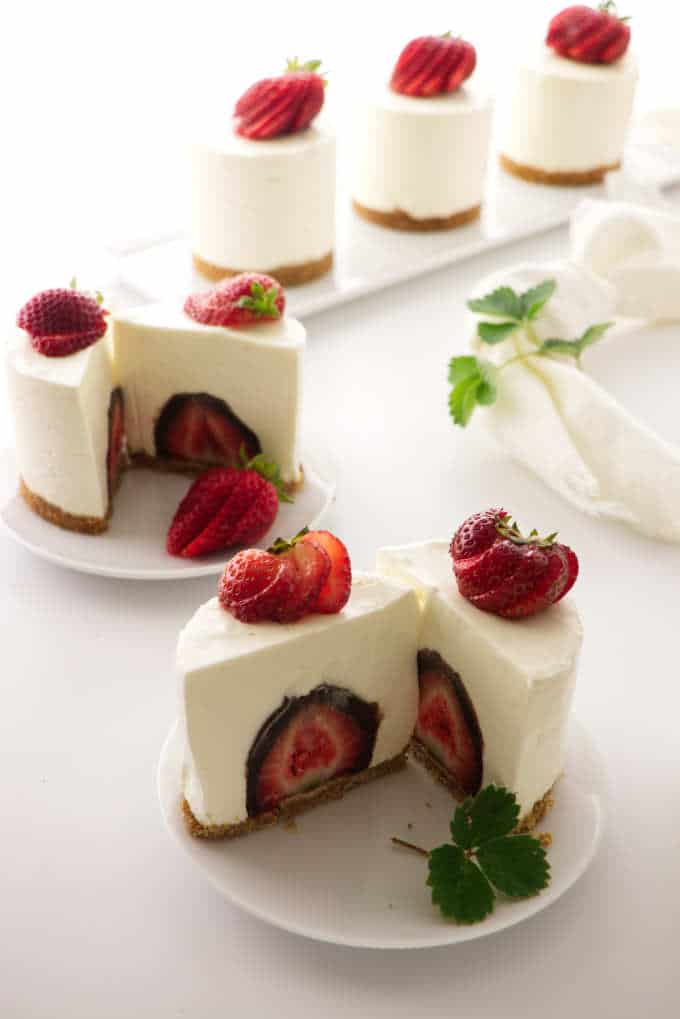
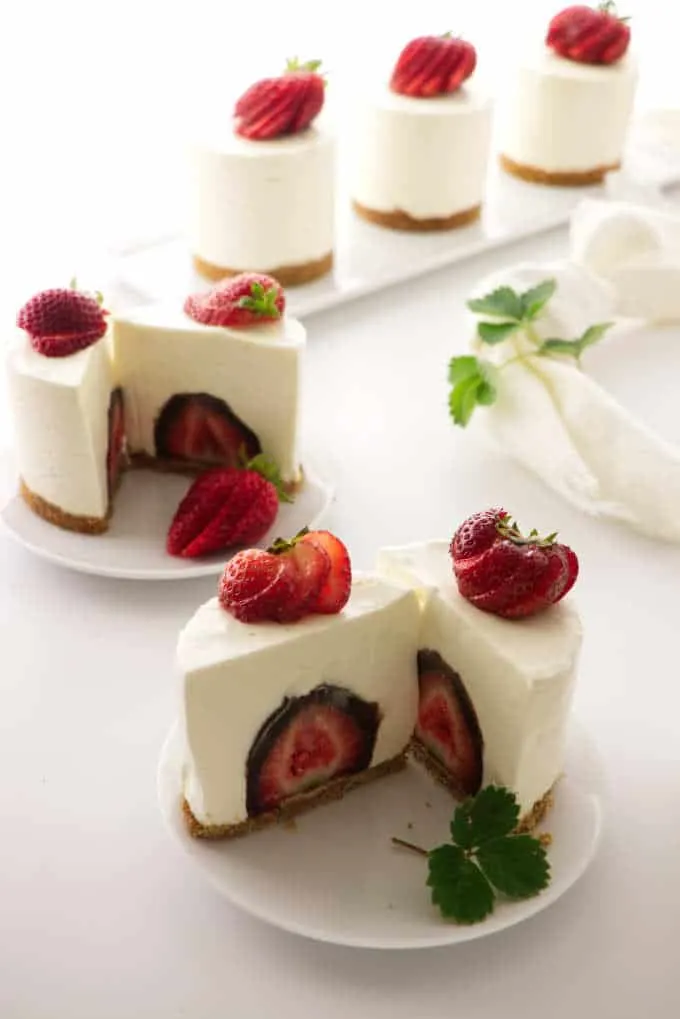
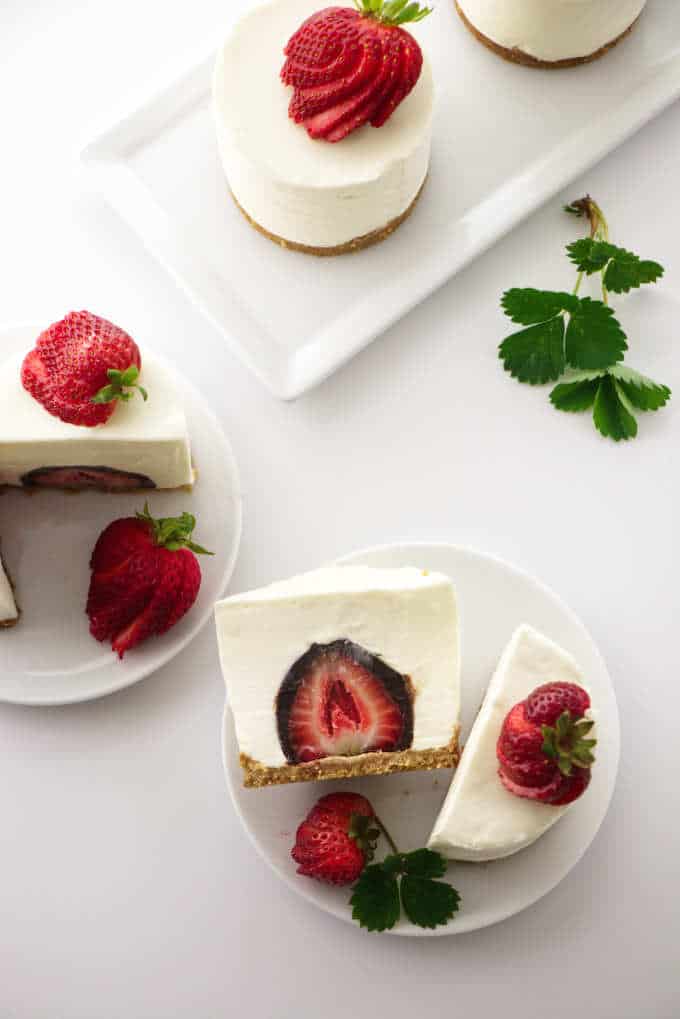
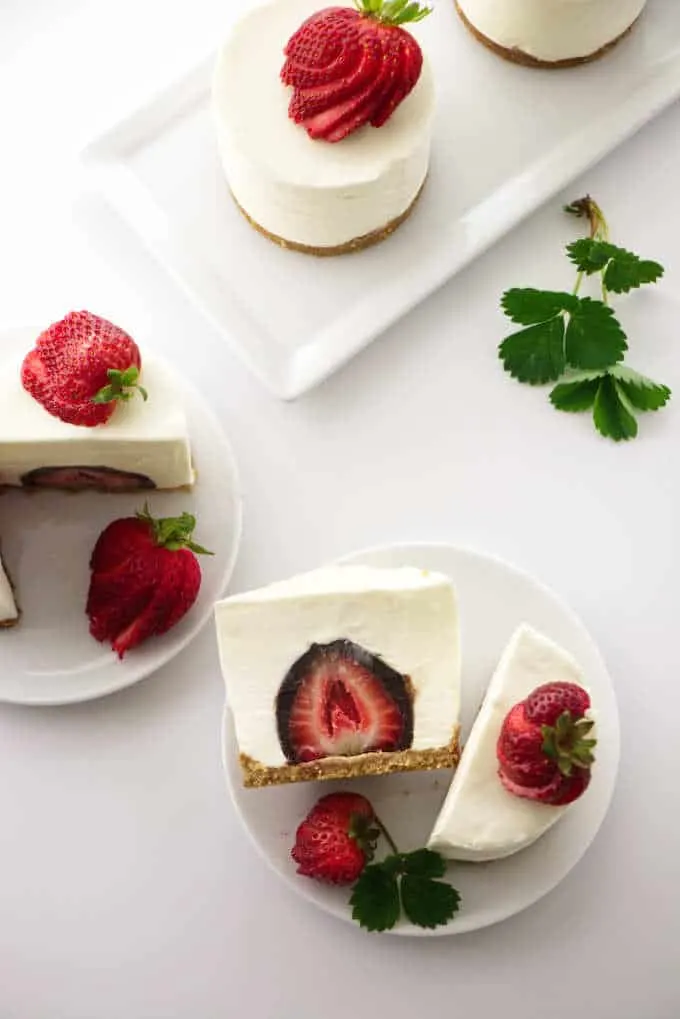
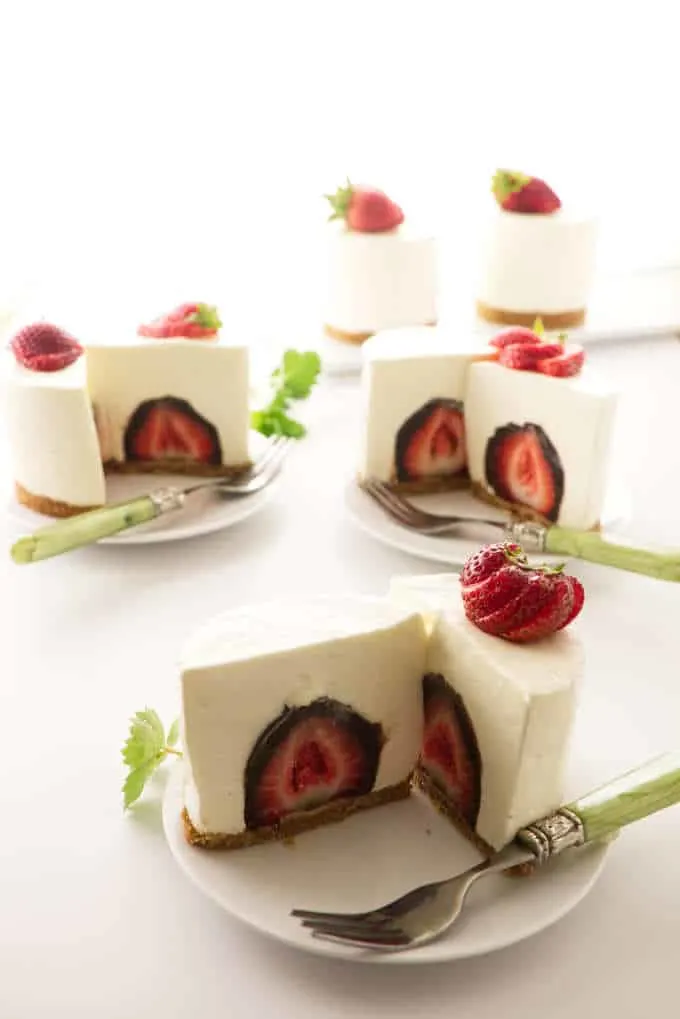
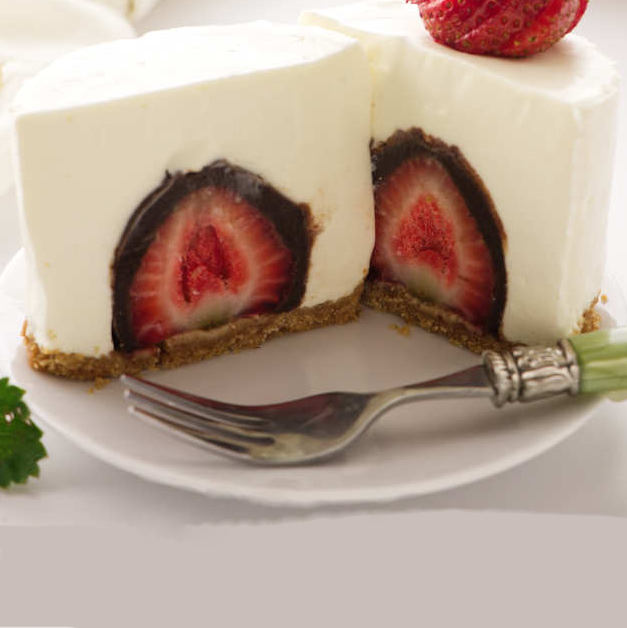
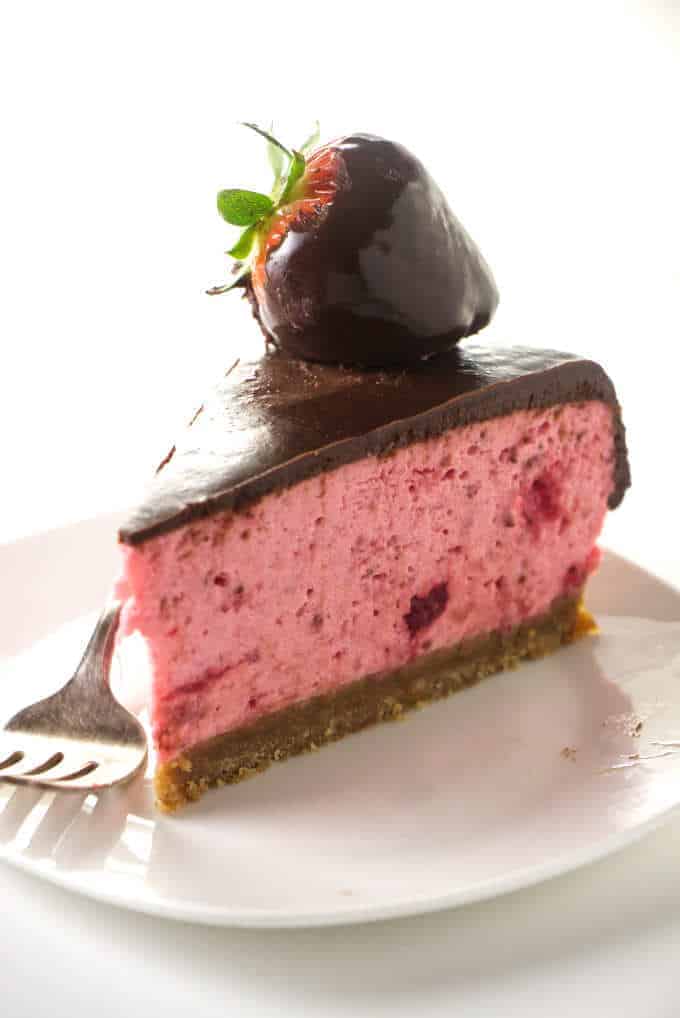
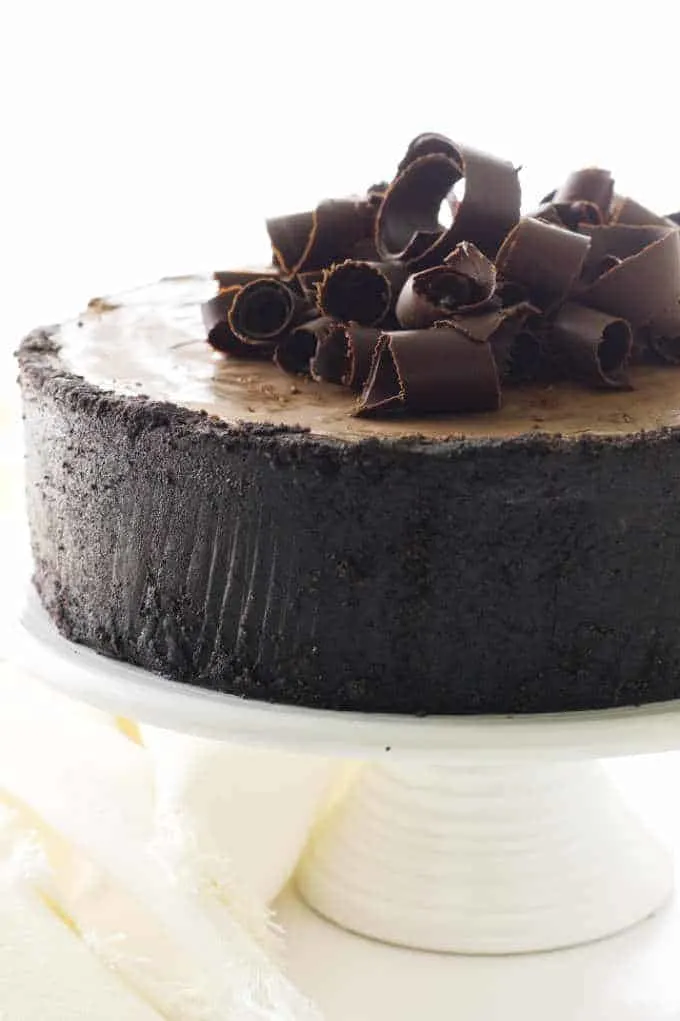
These individual no-bake cheesecakes are beyond awesome! The sweet vanilla cheesecake is smooth, creamy and delicious as it sits on a buttery graham cracker crust. But wait….there is a surprise in the center of the cheesecake! A fresh, chocolate covered strawberry! Keep this little surprise a secret when serving and watch as your guests dive into their own personal cheesecake. They will be delighted and scarf up every crumb.
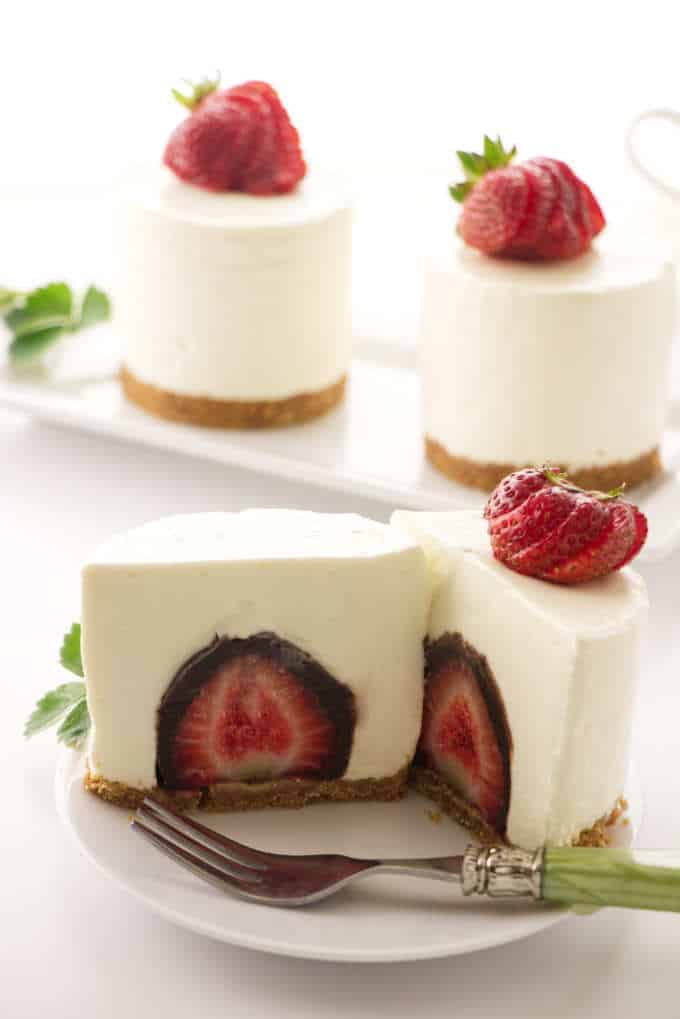

Everyone gets their own little cheesecake with this dessert. Since it is a no-bake cheesecake, it is the perfect dessert for summer when you don’t want to heat up the oven.
Even the crust does not go into the oven. The graham cracker crumbs are coated with butter and formed into sweet crusts that hold together as the butter hardens in the fridge.
No-bake cheesecake with gelatin
This is a no-bake cheesecake with gelatin and whipping cream added to the cream cheese. The gelatin gives the cheesecake structure and stability while the whipping cream and cream cheese keep it creamy, rich and smooth.
It is incredibly easy to make and the perfect consistency for hiding a chocolate-covered strawberry in the center.
How to make no-bake cheesecakes with chocolate-covered strawberries inside:
There are a few things you should know about this recipe before you get started.
Special supplies:
Mini Cheesecake pans:
First, you will want 3-inch cheesecake pans. If you use cupcake pans, the cheesecakes will be too small for the strawberries. Another common size pan for small cheesecakes are the 4-inch springform pans.
The 4-inch pans might work but when I placed the strawberries in the center, there was too much space between the strawberry and the edge of the pan. I wanted the strawberries to really stand out when the cheesecake was sliced open. The 3-inch pans are perfect, albeit a bit more difficult to get. I will provide a link if you can’t find it in your local kitchen store.
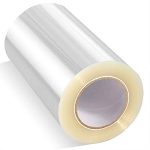
Acetate cake collars:
The mini cheesecake pans are a bit too shallow for a tall strawberry. You want to completely hide the chocolate covered strawberry in the center of the cheesecake. In order to cover the strawberry completely, you will want to extend the height of the cheesecake pans.
Acetate cake collars are the easiest way to make the mini cheesecakes taller. I used cake collars that are 3 inches tall. If you don’t want to buy acetate cake collars you can cut parchment paper into 3-inch strips and use them instead. Watch the video to see how I lined the acetate sheets around the mini cheesecake pans.
Update: Some readers have reported poor results with the parchment paper and found that it did not release from the cheesecake very well. For consistent results, I recommend using acetate collars.
About the no-bake graham cracker crust:
I made this recipe so that the entire dessert can be “no-bake”, including the graham cracker crust. It only takes 3 ingredients. Graham crackers, sugar, and butter. Combine the graham cracker crumbs, sugar and melted butter together then pack the mixture into the bottom of the pans.
You will need to press it down pretty firmly. I used the bottom of a small glass to press it down. You could also tamp it down with a cork or a small bottle. Just make sure you press it really firmly.
If the crumbs are not packed down firmly then the crust will crumble and fall apart when you slice the cheesecake.
Once it is packed down, stick it in the fridge. The melted butter will firm up and make the crust hard and crunchy.
It makes a pretty firm crust but it won’t get as crisp as one that you bake. If you want a super crisp crust then you can go ahead and bake it at 350°F for 10 minutes.
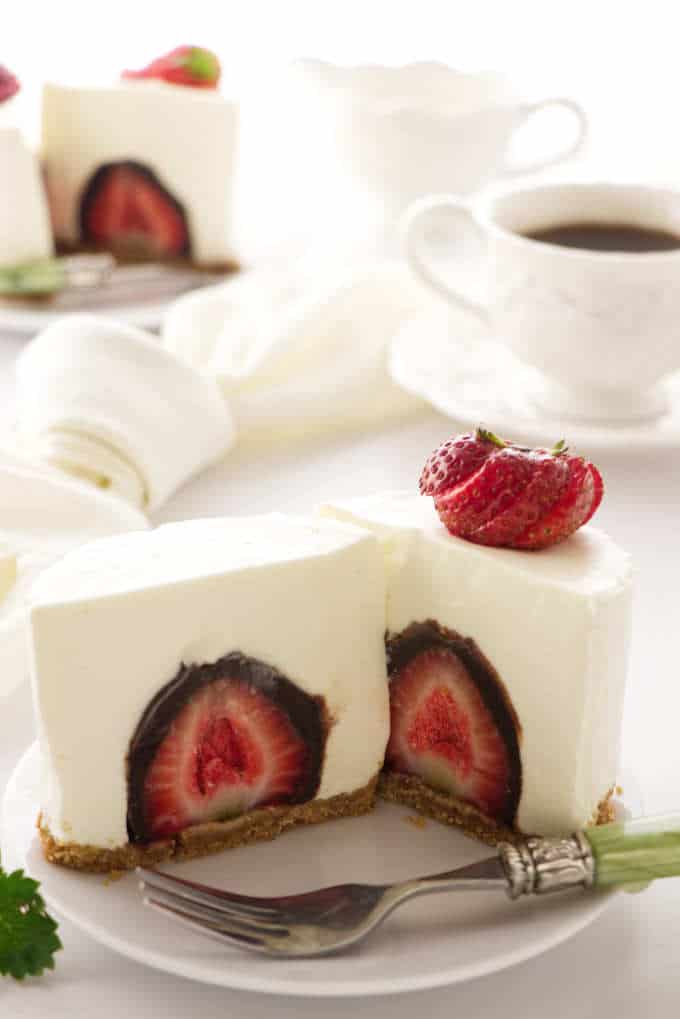
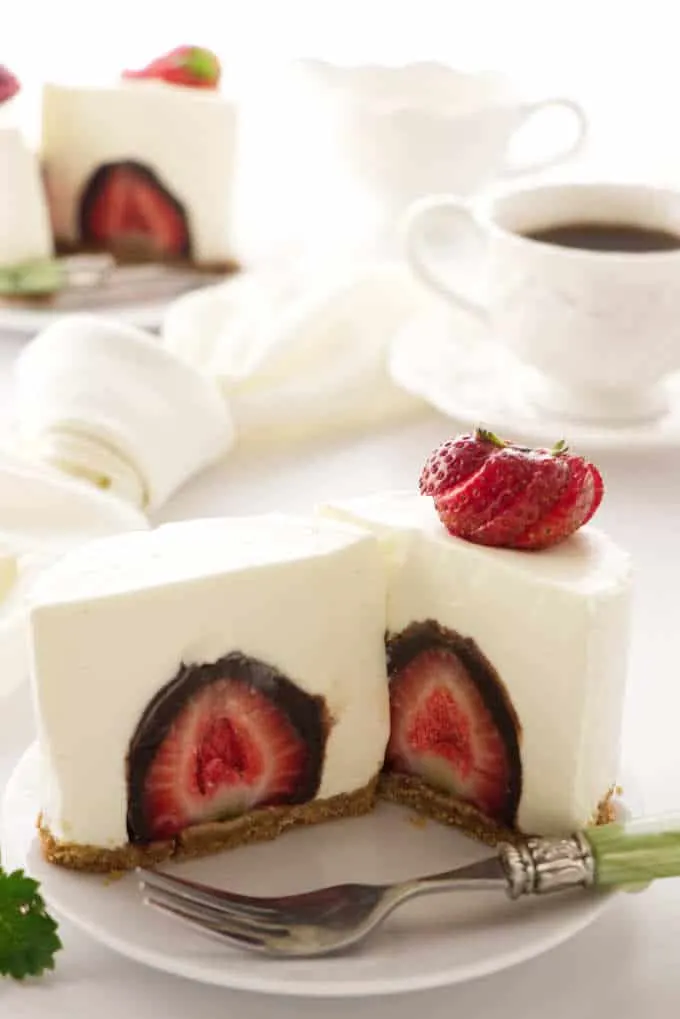
The chocolate-covered strawberries:
I made these little cheesecakes several times to get the recipe right. On the first try, I made the chocolate covered strawberries with plain melted chocolate. I placed them in the middle of the mini cheesecakes and let them firm up for a few hours.
The problem with making the chocolate covered strawberries with only melted chocolate is that the chocolate gets pretty firm. It was difficult to slice through the chocolate covered strawberries and I just wasn’t satisfied.
The best and yummiest solution was to cover the strawberries in a thick chocolate ganache. All you need to make chocolate ganache is chocolate and cream. With the right proportions of cream to chocolate, the ganache will put a thick coating around the strawberries and then firm up in the fridge.
The smooth, rich ganache is firm enough to hold its shape after it gets cold but it is still soft enough to slice through with a fork. The smooth, rich, chocolatey texture of chocolate ganache is the perfect solution for hiding chocolate-covered strawberries inside a creamy cheesecake.
The filling for the no-bake cheesecake with gelatin:
About the gelatin:
These individual no-bake cheesecakes need the support of gelatin. It is really easy to work with gelatin but I want to give you some tips.
A really important step when you work with gelatin is to let it bloom. Blooming gelatin is simply the process of softening the gelatin in liquid.
When the gelatin granules sit in water, they absorb the water and get larger, or bloom. After the gelatin absorbs water and gets soft, it will dissolve easily when you heat it up.
It only takes about 20 seconds in the microwave to dissolve the gelatin and turn it into liquid.
If you heat it up and get it nice and thin then let it sit for too long it will solidify into a firm, clear jello. It is ok if that happens. If it sits too long and gets firm before you put it in the cheesecake mixture then just give it another blitz in the microwave.
About the cream cheese:
You need to let the cream cheese sit out at room temperature and get soft. If you use cold cream cheese, it will not beat smoothly. It will have lumps and ruin the texture of your mini cheesecakes. If you forget to set the cream cheese out to soften, you can soften it within 30 minutes if you place the cream cheese in a plastic bag and let it sit in some lukewarm water.
You could also use the defrost button on your microwave but be very careful. Even on a low defrost setting, cream cheese will melt pretty easily.
About the whipping cream:
When it is time to add the whipping cream to the cream cheese mixture, it is best to stir the cream in by hand. If you use an electric mixer, the cream will thicken the cheesecake and make it more difficult to pour into the mini cheesecake molds.
It will still work but you will have a bigger chance of getting large air pockets in the center of the cheesecakes when you spoon it over the strawberries.
Pipe the mixture into the pans:
I placed the no-bake cheesecake mixture in a piping bag and piped it around, and on top of the chocolate-covered strawberries. The piping bag made it easy to get the mixture into the pans without adding in a lot of air bubbles.
You could spoon it into the mini pans but you will end up with more air bubbles that way. Just make sure you tap the pan a few times to break up the air bubbles.
These sweet little surprise cheesecakes are so delicious and it is a fun project that you can do up to two days in advance. You’re welcome!
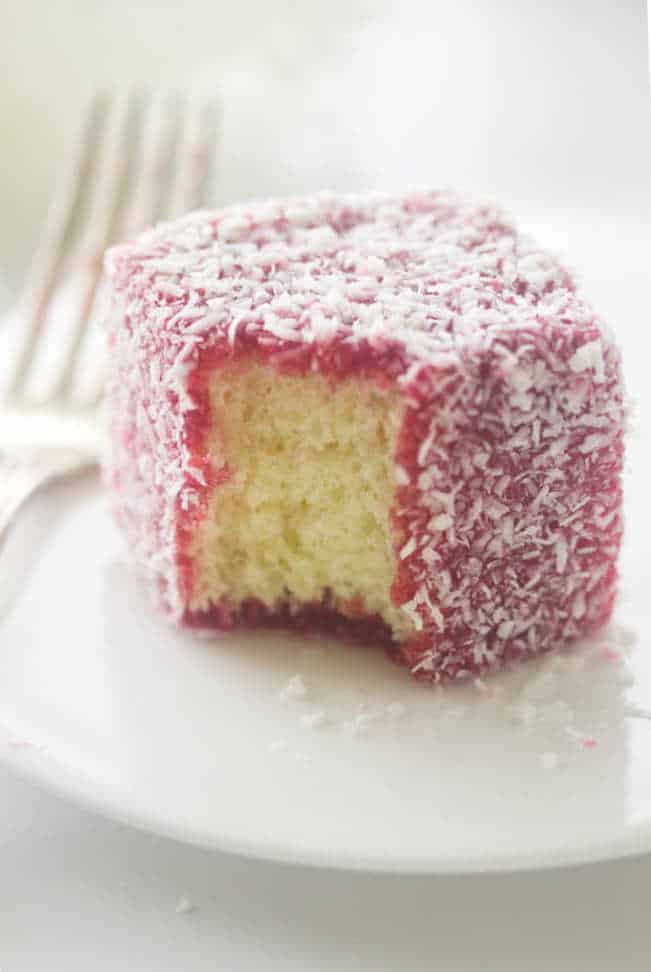
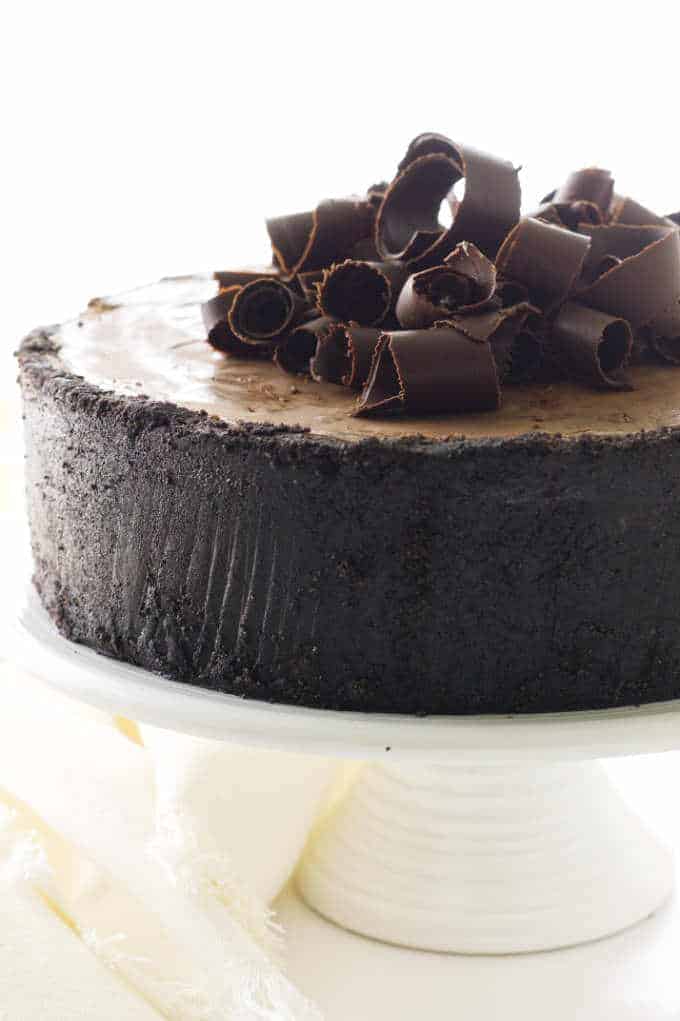
More Chilled or Frozen Desserts
- Lavender Panna Cotta with Lemon Syrup
- Strawberry Pie with Jello
- Mango Mousse Cake
- Mango “Ice Cream”
- 31 Cool Summer Dessert Ideas
- Basque cheesecake

Can you freeze this no-bake cheesecake?
We recommend eating these individual no-bake cheesecakes within 2 days of making them. The cheesecake, graham cracker crust, and chocolate ganache will all freeze and thaw just fine. However, the strawberry will make a watery mess when it thaws.
More Recipes to Try
- These chocolate chip cookie shots are absolutely adorable. They will make any party a happier event, especially if you pour a shot of Irish Cream in them :).
- Brown butter blondies are rich and decadent. You need them! The secret ingredient is….. brown butter (of course) and it gives the blondies an incredible flavor.
- This no-bake mocha chocolate icebox cake is fast and easy to make. You can use storebought cookies or whip up a batch of these crispy double chocolate cookies. Either way, you just can’t go wrong.
- For more unique desserts, try our Cookie Monster ice cream and lavender cupcakes.
Connect With Savor the Best:
Please follow us on our social media accounts
Facebook * Instagram * Pinterest * Youtube * Twitter
Did you make this recipe? We would love to hear from you. Drop us a comment below.
This recipe was inspired by a photo my sister saw on Instagram. She couldn’t find a recipe so she asked my mother and I If we could try to “reverse engineer” the dessert.

No Bake Cheesecake with a Surprise Inside
Ingredients
Graham cracker crust
- 1 cups graham cracker crumbs from 8-9 graham crackers
- 2 tablespoons granulated sugar
- 4 tablespoons butter melted
Chocolate covered strawberries
- ½ cup heavy cream
- 8 ounces dark chocolate finely chopped
- 6 large strawberries
Cheesecake filling
- ¼ cup cold water
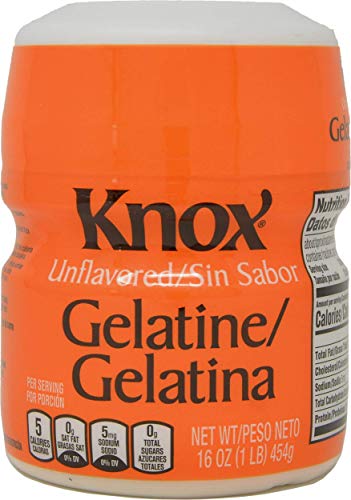
- 1 tablespoon Knox unflavored powdered gelatin
- 24 ounces cream cheese block style, softened
- 1-½ cups powdered sugar
- 2 teaspoons vanilla extract
- ½ teaspoon salt
- 2-¼ cups heavy cream
Equipment:
Instructions
Graham Cracker Crust
- Place the graham crackers, sugar, and butter in a bowl and stir it until it looks like wet sand and it holds together when you pinch it. Press the mixture into the bottom of six 3-inch pans. Place them in the refrigerator to chill while you make the filling.
Chocolate covered strawberries:
- Line a plate with parchment paper and set aside.
- Heat the heavy cream in the microwave or in a saucepan over medium heat on the stove. Only heat it until it gently simmers and don’t let it boil.
- Pour the hot cream into the chopped chocolate and let it sit for a few minutes until the chocolate melts. Once the chocolate melts, stir it until it is smooth.
- Slice the green leaves off of the strawberries and dip them into the chocolate ganache.
- Place the chocolate-covered strawberries on the parchment-lined plate and set them in the fridge to get firm.
Cheesecake filling
- Put the cold water in a microwavable bowl and sprinkle the gelatin over the water. Set the gelatin aside to soften (or bloom) for at least 5 minutes while you beat the cream cheese.
- Place the cream cheese in a large mixing bowl and beat with an electric mixer until it is smooth and there are no lumps.
- Add the sugar, vanilla, and salt and beat until smooth and creamy. Make sure you scrape down the sides and bottom of the bowl to incorporate all the ingredients well.
- Stir in the heavy cream by hand. Don’t use the electric beater for this step or the mixture will get too thick to easily pour into the cheesecake pans.
- Place the softened gelatin in the microwave for 20 to 30 seconds, stirring at 10-second intervals. Heat it until it is completely dissolved and liquid. Keep an eye on it and stop the microwave if it starts to boil. Let it sit for a few minutes until it is comfortably warm.
- Drizzle the warm gelatin into the cream cheese mixture and stir it until it is well incorporated.
Make the mini cheesecakes:
- Place the chocolate-covered strawberries in the center of each of the mini pans.
- Line the inside of the mini pans with a strip of acetate sheets.
- Spoon or pipe the filling over the chocolate covered strawberries inside the mini cheesecake pans and smooth the tops. Cover them with plastic wrap and refrigerate for at least 4 hours or preferably overnight.
- When ready to serve, push up on the bottoms of the cheesecake pans and remove the individual cheesecakes. Transfer them to a serving plate and remove the acetate sheets. garnish with strawberries or mint leaves.
- To get a clean, pretty slice, dip a sharp knife in hot water then slowly slide it through the center of the cheesecakes.
Notes
- You will need about 8 to 9 graham crackers to make 1 cup of crumbs. To make the crumbs either pulse the crackers in a food processor or place them in a sealable plastic bag and pound them with a rolling pin.
- When you sprinkle the gelatin over the water, disperse it evenly over the water. If you dump it in a pile then the center of the pile will not soften. For a smooth cheesecake texture, it is important to let the gelatin soften in the water before you heat it up and dissolve it.
- Make sure you let the cream cheese come to room temperature before making this recipe. Cold hard cream cheese will not beat into a smooth creamy consistency as easily. You don’t want lumps of cream cheese in your cheesecake.
- Want to soften your cream cheese quickly? Place it in a bowl of lukewarm water (while the wrapper is still on) for 30 minutes. Make sure the water is not too hot though or it will melt.
- The gelatin helps firm up the cheesecake and hold the strawberry in the center.
- The graham cracker crust will get firm in the fridge but since it is a no-bake crust, it will be a bit crumblier than a baked graham cracker crust. If you want to make the crust crispy and more firmly set, bake it for 12 minutes at 350°F then let it cool before making the cheesecakes.
- The acetate collar will give the cheesecake additional height so the strawberries will be completely covered. You could also cut 3-inch wide strips of parchment paper to use as liners if you do not have any acetate sheets. However, some readers reported that the parchment did not work well for them.
- Dip a sharp knife in hot water before slicing the cheesecake. The hot knife will slide through the cheesecake easier and make a clean, smooth cut.


Mary
Sunday 31st of March 2024
I originally followed the recipe exactly. Unfortunately they didn’t set at all. A professional baker provided some advice that based on the volume/weight of all the ingredients, the amount of gelatin was much too low. I had to almost triple the amount after which they set perfectly. Not sure if there’s a typo in the recipe or conversion factor or what the issue was. But making that adjustment solved it. They were delicious and looked amazing inside and out. Very happy I found this recipe. Thank you so much!
Mary
Monday 1st of April 2024
@Dahn Boquist, Thanks for the quick reply! :).
I used Knox powdered gelatin. It’s the one I usually use and have never seen any other kind. Is there a different kind I should have used)? I bought it just for the recipe so nowhere near BB date (in case that impacts anything). The packets I have are 1 Tblsp each so didn’t know whether to use 1-1/2 packets or 1 tblsp (I think ended up using the 1-1/2 packets). But they didn’t set at all. After I added the extra gelatin, they were not rubbery.
I heated it up in increments as per the instructions just enough so it would dissolve.
Also, out of curiosity, I have never mixed gelatin with cold water before and let it sit before heating it. What does that do to the gelatin vs just adding hot water?
Thanks for your help!
Dahn Boquist
Monday 1st of April 2024
There is no typo. The amount of gelatin is correct. If you double or triple the gelatin, the cheesecake will turn out rubbery. There are other reasons that this may not have set up on your first try. What type of gelatin are you using? Different types of gelatin have varying bloom strengths. Also, excessive heat can reduce gelatin's effectiveness so it is important that you only heat it until it becomes liquid.