
Mimosa Cake Recipe
Julianne Bayer Dell | Beyond FrostingWhether you’re celebrating the holidays or not, this Mimosa Cake will be a crowd pleaser. It’s a moist champagne sponge cake with an orange Swiss meringue buttercream frosting.
This post is sponsored by Silpat. The contributor received a Silpat for review and was compensated for recipe development. All opinions are her own.
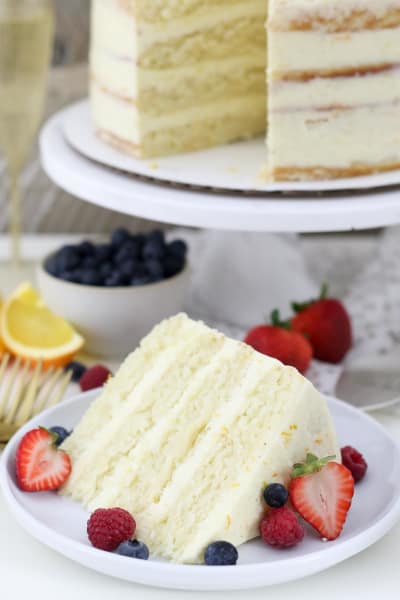
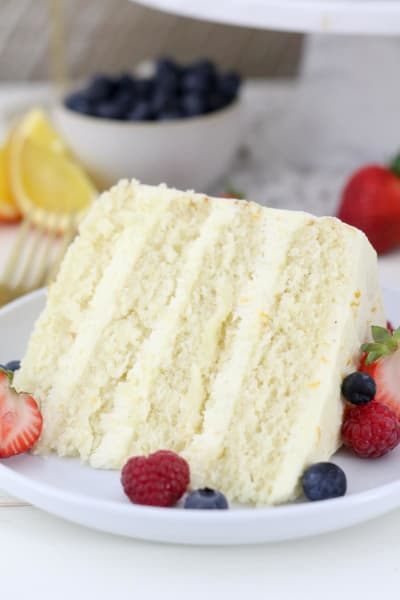
Nothing says, “I’m ready for the holidays” more than a Mimosa Cake. While I’ve shared numerous champagne-flavored treats on my blog, I have a major crush on this cake. This Mimosa Cake is a moist champagne sponge cake with an orange Swiss meringue buttercream frosting.

The cake itself is an adaptation of my moist vanilla cake; I’ve swapped out regular milk for buttermilk and champagne. I also added a bit of orange zest for flavor, but a majority of the orange flavor is actually coming from the buttercream.

I don’t often use Swiss meringue buttercream because it is a bit more labor intensive, but the results are well worth it. The buttercream is silky smooth, much less sweet than traditional American buttercream, and the buttery flavor actually really complements the cake. It’s one of my favorite frostings to eat.
I have a whole post dedicated to tips for making Swiss Meringue Buttercream because it can be intimidating at first. If you read through these tips and the full instructions of the recipe prior to starting, you’ll be just fine!

You’ll notice I call out for vanilla bean paste in the recipe. This is definitely a premium ingredient but it can easily be swapped out for vanilla extract. I just love the little speckles of vanilla bean in the buttercream. Since this is such a large cake, I’m not exaggerating when I say you will need a lot of butter!
Traditionally, I make 8-inch cakes with 3 layers, but today I’m serving up a 4 layer 9-inch cake and there’s good reason! My favorite baking tools in the kitchen are my silicone Silpat liners, which I use for baking everything from cookies and brownies to potatoes and vegetables.
Silpat is now offering a 9-inch round baking mat, which is AMAZING if you make as many cakes as I do.
Previously, any time I would make a dessert in my springform pan or even when baking cakes, I would always line the bottom of the pan with parchment paper so that the crust wouldn’t stick to the pan. Now, I can stop wasting all my parchment paper and start using my Silpat!
However, it does not sit perfectly in the bottom of my 9-inch baking pans. After trying several different brands of 9-inch pans, I’ve determined that this is a bakeware manufacture issue because the bottom on the pans aren’t actually a true 9 inches wide at the base.
I also noticed the sides of the pan are not completely straight, which explains why these cakes sometimes turn out oddly shaped.
In order to use these 9-inch Silpat liners in my 9inch baking pans, they had to wrap up the sides of a pan a little bit, but that actually helped me slip my knife underneath to get the cakes out of the pans once they were baked.
I baked my cake using 9-inch Silpat rounds and not only did they prevent the bottom of my cake from browning, it also made it much easier to get the cake out of the pan.
These Silpat liners do fit perfectly in my 9-inch springform pan, which is what I use most for cheesecakes and no-bake desserts. I foresee myself ditching the parchment paper and using these from now on!

For this 4-layer cake, I baked 2 layers at a time, allowed the cakes to cool for about 10 minutes and then reused the pans to bake the second two layers. If you happen to have four 9-inch pans, you can make them all at the same time but I’d expect that you would need to rotate them halfway through baking, and your baking times might be increased.
If you make a double batch of the cake batter, some of your batter will be sitting out while your first two layers are baking, you should remix the batter before filling your pans the second time as the batter can separate if it has been allowed to sit for too long. Also, be sure to scrape the bowl prior to remixing to get anything off the bottom of the bowl mixed into your batter.
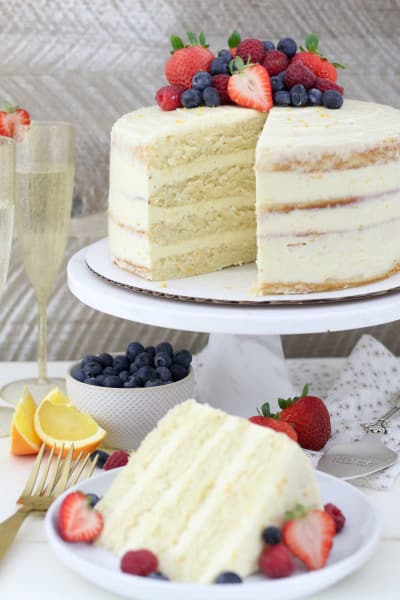
There is just enough frosting in this recipe for a rustic crumb coating, so I’ve garnished it with fruit. One suggestion I have to get your fruit to stack nice and high is to put a dollop of frosting under the fruit (directly on the surface of the cake) and then use that like a “glue”, sticking your fruit up against the frosting and building from there.
Now go grab an extra-large plate for this Mimosa Cake!
Win a $75 Visa Gift Card and a Silpat 9" Cake Round! Enter Below!
Mimosa Cake Recipe


Rate This Recipe
Ingredients
For the Cake :- 1 1/2 cups Granulated Sugar
- 1/4 cup Oil, plus 2 tablespoons
- 2 large Eggs
- 2 teaspoons Pure Vanilla Extract
- 1/3 cup Sour Cream
- 1 3/4 cups Flour
- 2 1/4 teaspoons Baking Powder
- 3/4 teaspoon Salt
- 1/2 cup Buttermilk
- 2/3 cup Champagne
- 1 large Orange, zested
- 3 cups Unsalted Butter, at room temperature
- 10 large Egg Whites, at room temperature
- 2 1/2 cups Granulated Sugar
- 1 tablespoon Vanilla Bean Paste, or pure vanilla extract
- 2 large Oranges, zested
Directions
To make the cake:
- Preheat the oven to 350°F.
- In a large mixing bowl, combine the sugar, vegetable oil, eggs, and vanilla extract. Beat on medium speed until the eggs and oil are well incorporated and the batter is lighter in color, about 2 minutes. Scrape down the bowl as needed.
- Next mix in the sour cream and beat until well combined.
- Add half the flour followed by the baking powder, salt and buttermilk. Beat on low speed until the flour starts to incorporate.
- Finally add the remaining flour, mixing on low speed while pouring in the champagne and beating until all of the ingredients are well combined.
- Use a spatula to scrape down the sides of the bowl and stir the batter from the bottom to the top to ensure it’s well mixed.
- Pour the batter in two 9-inch round baking pans lined with a Silpat baking mat and bake at 350°F for 18-22 minutes, keeping a careful eye on the baking during the last few minutes. Remove from the oven and allow to cool completely.
- Test the cake for doneness by inserting a toothpick into the center of the cake. If the toothpick comes out clean, your cake is done. Allow the cake to cool for approximately 10 minutes and remove the cake from the pan.
- Repeat the above steps to make the next two layers.
To make the frosting:
- Combine the granulated sugar and egg whites in your stainless-steel mixer bowl (or any heat-proof glass or metal bowl). Attach a candy thermometer to the side of the bowl.
- Set the bowl over top of a saucepan with water, just enough to cover the bottom of the pot. You do not want the water to boil and touch the bottom of your mixing bowl.
- Heat the mixture over medium to medium-low heat, stirring constantly to prevent the egg whites from cooking. Heat the mixture to 140°F. When it reaches 140°F, the sugar should be dissolved in the egg whites. You can test this by placing a drop on your fingertips and rubbing them together. The mixture should be completely smooth.
- Transfer the mixing bowl to your stand mixer. Using the wire whisk, beat the egg whites. Start on low speed and increase the speed to medium speed after 2 minutes.
- Beat for approximately 10 minutes on medium speed until your frosting turns white as the egg whites are whipped and the body of the meringue starts to form peaks that are thick, glossy and soft.
- After you have beat the meringue for a total of about 10-15 minutes, the bottom of your mixing bowl should be cooled completely. Scrape down all sides and bottom of the bowl.
- Slice the butter into 1-tablespoon pieces. Switch to the paddle attachment on your mixer. Beat at a medium-low speed and slowly add the butter 2 tablespoons at a time, ensuring it is mixed well after each addition. The frosting may appear curdled at this point; that’s okay.
- Add the vanilla bean paste and orange zest and continue beating on medium speed for about 3-5 minutes until the frosting is smooth and silky.
Notes
- This cake recipe is for 2 layers. You will need to double this cake recipe for the 4-layer cake. I suggest baking only 2 layers at a time.
- This is for the full batch of frosting for a 4-layer cake.
- This frosting recipe is slightly adapted from Sweetapolita.
- The vanilla bean paste can be swapped out for vanilla extract.
- The buttermilk can be swapped out for regular milk.
Recommended

- Published:
- Modified:
- Author:
- Julianne Bayer Dell
- Cooking Method:
- Baking
- Cuisine:
- Boozy Food
- Category:
- Desserts
- Tags:
- Cakes, Baking, Baked, Desserts, Party Food, Citrus, Oranges, Boozy Food
- Related Recipes:
- Cake Recipes, Baking Recipes, Baked Recipes, Dessert Recipes, Party Food Recipes, Citru Recipes, Orange Recipes, Boozy Food Recipes
- Recipe Yields:
- 15 servings
- Prep Time:
- Cook Time:
- Total Time:
- Related Post:
-
Published:
Author: Julianne Bayer Dell
Recipe Yields: 15 servings
Prep Time: 40 minutes
Cook Time: 20 minutes
Total Time: 60 minutes
Nutrition Facts
Amount Per Serving


